

Overview
Are you ready to take your GraphQL development skills to the next level? In this series of four articles, I'll guide you through the process of building a powerful GraphQL API using Nest and MongoDB. You'll learn best practices, and see how to scale your app just as you would in a real-world scenario.
First, we'll kick things off by diving into the fundamentals of Nest, a powerful NodeJS framework. We'll set up the foundation for our final project, and by the end, you'll know how to manually deploy your own sample application, if you missed this part, please take a moment to read it here.
Next, we'll delve into the world of Test Driven Development (TDD) for GraphQL. You'll see the benefits it brings to the development process and learn how to test your current resolvers and implement new ones using this approach.
In the third installment(current reading), we'll explore how to apply Continuous Integration and Continuous Deployment (CI/CD) to Nest and GraphQL apps. We'll create our pipelines and, building off the concepts from the second part, you'll see the true power of this approach in action. Once set up, you won't have to worry as much about delivering to the frontend team, and you'll be able to catch errors even before the app is shipped to client apps.
Finally, in the fourth and final installment, we'll take things up a notch by adding features that will introduce you to the world of micro-services. You'll learn how to break down your monolithic app into smaller, independent micro-services without disrupting any existing functionality. This is the modern approach, saving you from the headache of long, drawn-out migrations. So, let's get started and take your GraphQL development skills to the next level!
The full source code can be found here(part-3) branch.
Prerequisites
To fully benefit from this series, it's important you have read the first and second parts of the series, and have a basic knowledge of NodeJS, GraphQL, NestJS, TypeScript, and MongoDB. However, even if you're new to these technologies, don't worry - this series will provide a comprehensive overview of our stack, including the most crucial aspects we'll be using along the way.
What is CI/CD?
CI/CD stands for Continuous Integration/Continuous Deployment and refers to a software development practice where developers continuously integrate code changes into a shared repository and continuously deploy those changes to production. In the context of developing GraphQL APIs using NestJS, CI/CD would involve automating the steps involved in building, testing, and deploying the API to a production environment.
The following is an example of a CI/CD pipeline for a GraphQL API built using NestJS:
Code is committed to a shared repository such as Git.
The CI/CD server (e.g. Jenkins, TravisCI, GoogleCloud Build) triggers a build whenever code is committed to the repository.
The build process compiles the code and runs automated tests to ensure that the code meets the required quality standards.
If the tests pass, the CI/CD server will deploy the code to a staging environment for further testing.
If the tests in the staging environment pass, the code will be deployed to the production environment.
The production environment is monitored, and if any issues arise, the CI/CD pipeline can be used to quickly roll back the code to a previous version.
Then we repeat the process
Here is a diagram to showcase what is written above:
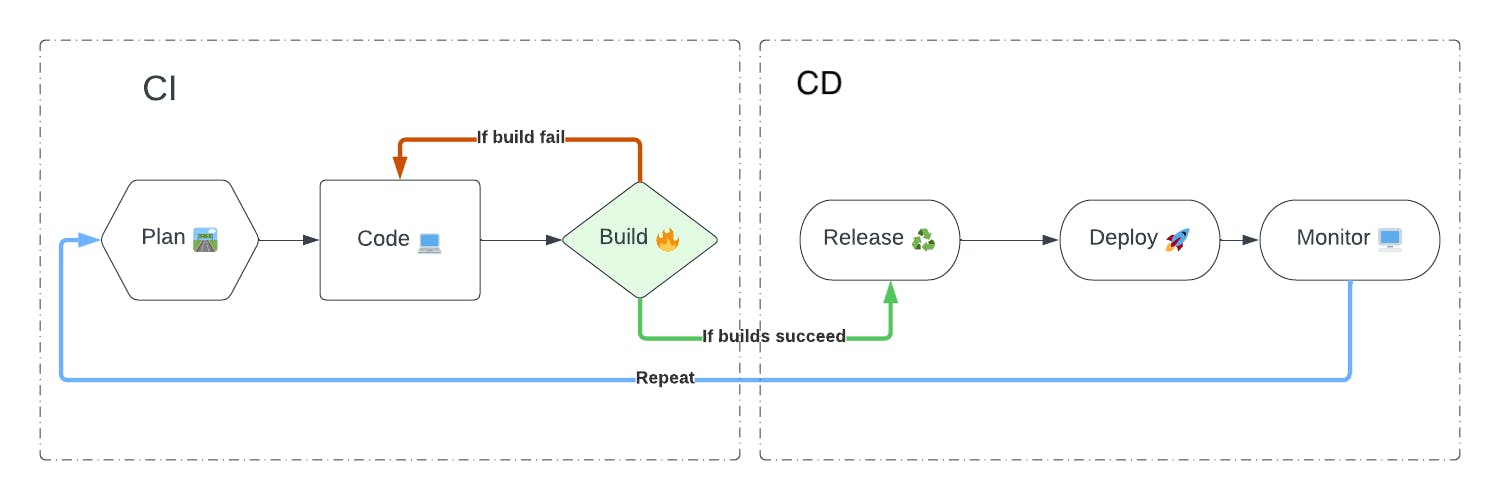
image1 - CI/CD Overview
Advantages of CI/CD
The benefits of using CI/CD for our GraphQL API built with NestJS include:
Faster and more reliable deployment processes
Improved code quality through continuous testing and integration
Improved collaboration between developers and teams (frontend and backend teams for example).
Reduced risk of human error in deployment processes
Faster resolution of issues and bugs in production.
Choose your tools
There are plenty of tools that can help you achieve CI/CD pipelines, depending on your budget, the complexity of the project, and the size of your team, including:
GitHub Actions: easy to set up and free trial available
Jenkins - an open-source automation server for building, testing, and deploying software.
Travis CI - a cloud-based continuous integration and deployment platform for open-source and private projects.
CircleCI - a cloud-based continuous integration and deployment platform that supports various languages, including JavaScript.
GitLab CI/CD - a built-in Continuous Integration, Continuous Delivery, and Continuous Deployment solution in GitLab, an open-source Git-repository manager.
AWS CodeDeploy - a deployment service that automates software deployments to a variety of computing services, including Amazon EC2, AWS Fargate, and Lambda.
etc
You can use this website to compare these tools.
For this tutorial, we'll be using Github actions for their simplicity. However, as your project grows larger, you may need to consider using Docker, setting up a repository on EC2 or Google Cloud Run, and implementing CI/CD actions. And if your project becomes even bigger, you may need to have a team specifically dedicated to DevOps managing these operations.
CI/CD in action
For our use case, using Github actions, this is the flow we need to implement:
A developer works on his feature(assigned by the project manager or the team lead): PLAN & CODE
Once he is done, the developer pushes his code to a feature, bugfix or hotfix branch
When the user creates a PR, we need to trigger 2 actions(BUILD):
Build the code, using
yarn buildto make sure the code is compiling correctlyTest our unit and end-to-end test
If those checks don’t pass, even before someone reviews the code, the developer will be able to see what is failing, is it the build? or the test?
If they pass, a code reviewer can validate the code and approve it for production, but instead of deploying them manually, by merging on the development branch, we need to trigger a staging environment and deploy them on Render (so that the QA team can test the preview) before moving in the production environment.
This repeats over and over.
Let’s first write actions to check if the build and test pass:
In the root of the project, let’s create a folder
.github/workflowsWe don’t need to create actions from scratch, the GitHub marketplace gets us covered, you can find a ton of actions depending on your setup, for our project, let’s create a
build.yamlfile, like the following:name: Builds & Tests # Controls when the workflow will run on: pull_request: branches: ['develop'] # A workflow run is made up of one or more jobs that can run sequentially or in parallel jobs: build: # The type of runner that the job will run on runs-on: ubuntu-latest # Steps represent a sequence of tasks that will be executed as part of the job steps: # Checks-out your repository under $GITHUB_WORKSPACE, so your job can access it - uses: actions/checkout@v3 - name: read .nvmrc run: echo ::set-output name=NVMRC::$(cat .nvmrc) id: nvm - name: Setup node ${{ steps.nvm.outputs.NVMRC }} uses: actions/setup-node@v3 with: node-version: '${{ steps.nvm.outputs.NVMRC }}' - run: yarn install - run: yarn build test: # The type of runner that the job will run on runs-on: ubuntu-latest # Steps represent a sequence of tasks that will be executed as part of the job steps: # Checks-out your repository under $GITHUB_WORKSPACE, so your job can access it - uses: actions/checkout@v3 - name: read .nvmrc run: echo ::set-output name=NVMRC::$(cat .nvmrc) id: nvm - name: Setup node ${{ steps.nvm.outputs.NVMRC }} uses: actions/setup-node@v3 with: node-version: '${{ steps.nvm.outputs.NVMRC }}' - run: yarn install - run: yarn testLet’s break down what we have above:
These actions will be triggered only when a pull request is raised on the branch develop, we have set this up with the
on-property in the file aboveAs the name suggests, we have two jobs to execute separately, first, we build the project, to achieve the build, we need to install packages, we also set the node version in a
.nvmrcfile, that’s why we started reading on top of the build and test job scope, then the test job will install, before testing.I have made an update where we are using .env files, as this file is not pushed on GitHub, you may see your test failing on login or sign-in, to prevent it, you can inject those variables into the GitHub repository, or add a default value to those variables like:
  // auth.service.ts
  ...
  {
      secret:
        this.configService.get<string>('JWT_SECRET') || 'testingEnvSecret',
  },
  ...
Now let’s create a PR, this is what we get:
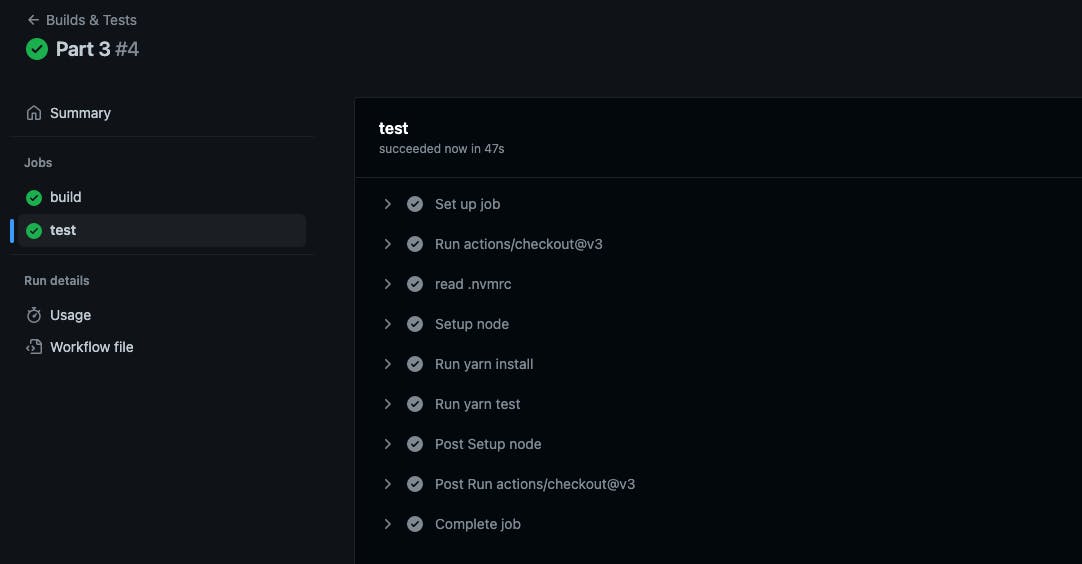
image2A - CI in action
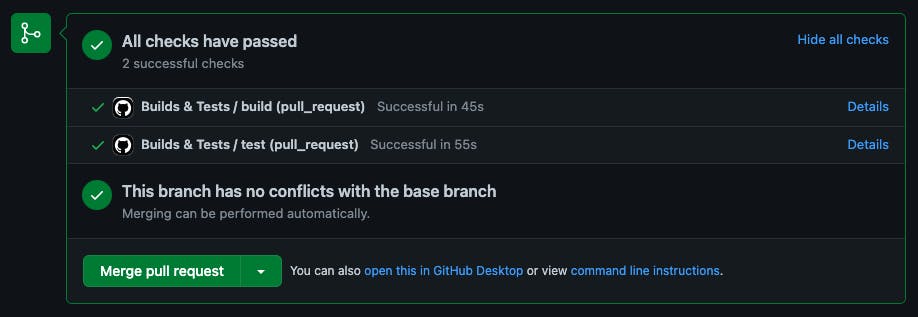
image2B - CI in action
As you can see, both of our build and test jobs are working correctly, well done, we have done the CI part of the CI/CD.
Now, let’s write an action to deploy, from the fact that our CI actions pass correctly, in the CD ones, we will only focus on deploying the app, in the GitHub marketplace, you can find such actions, no need to reinvent the wheel.
In the same directory, let’s create a deploy.yaml file, like the following:
    name: Trigger Render Deployment
    on:
      push:
        branches: ['develop', 'main']
    jobs:
      deploy:
        name: Deploy to Render
        runs-on: ubuntu-latest
        steps:
          - name: Trigger deployment
            uses: sws2apps/render-deployment@main
            with:
              serviceId: ${{ secrets.RENDER_SERVICE_ID }}
              apiKey: ${{ secrets.RENDER_API_KEY }}
              multiple: false
As you can see here, we are using secrets variables, in the render dashboard, under account settings, click on API Keys and generate a new secret, and save it:


image3 - Create a new API key
Then as you are in the dashboard, select your project, the URL will look like this:
https://dashboard.render.com/web/RENDER_SERVICE_ID
From the URL, retrieve your service id, and save it.
Now, in the GitHub repository, you need to inject those variables, under Settings → Secrets → Actions, click on New repository secret then add them both

image4 - Add repository secrets
🛠️ With that setup, we are good to test our actions.
Push your changes on GitHub once again
Make sure the CI actions are still passing
Then merge the PR
Wait a couple of minutes until the project deploys, Github will add the deployment link to your repository.
Well done, our CI and CD actions are working correctly, you have made it 🚀
Conclusion
In this part, we have decided to use Github Actions for our CI/CD implementation for Nest and GraphQL applications, due to its simplicity, keeping in mind that the choice may vary depending on your team and project size. By setting up our pipelines and leveraging the concepts discussed in the previous installment, we will be able to streamline our delivery process and catch errors early on, if any. With GitHub Actions, we can focus on delivering the best possible experience to our end-users, and have peace of mind knowing that our CI/CD processes are working efficiently. The use of GitHub Actions highlights the importance of a streamlined CI/CD process and its positive impact on the overall development process.