Build a GraphQL API with NestJs and MongoDB, in a modern way - Part 1.

I'm a passionate software engineer with extensive experience building enterprise-level applications from scratch using JavaScript technologies. I love writing and sharing knowledge with others, and I believe that the best way to learn is by teaching. When I'm not coding, you can find me buried in a good book or challenging my mind with a game of chess.
Overview
Are you ready to take your GraphQL development skills to the next level? In this series of four articles, I'll guide you through the process of building a powerful GraphQL API using Nest and MongoDB. You'll learn best practices, and see how to scale your app just as you would in a real-world scenario.
First, we'll kick things off by diving into the fundamentals of Nest, a powerful NodeJS framework. We'll set up the foundation for our final project, and by the end, you'll know how to manually deploy your own sample application.
Next, we'll delve into the world of Test Driven Development (TDD) for GraphQL. You'll see the benefits it brings to the development process and learn how to test your current resolvers and implement new ones using this approach.
In the third installment, we'll explore how to apply Continuous Integration and Continuous Deployment (CI/CD) to Nest and GraphQL apps. We'll create our pipelines and, building off the concepts from the second part, you'll see the true power of this approach in action. Once set up, you won't have to worry as much about delivering to the frontend team, and you'll be able to catch errors even before the app is shipped to client apps.
Finally, in the fourth and final installment, we'll take things up a notch by adding features that will introduce you to the world of micro-services. You'll learn how to break down your monolithic app into smaller, independent micro-services without disrupting any existing functionality. This is the modern approach, saving you from the headache of long, drawn-out migrations. So, let's get started and take your GraphQL development skills to the next level!
The full source code can be found here(part-1) branch.
Prerequisites
To fully benefit from this series, it's important to have a basic knowledge of NodeJS, GraphQL, NestJS, TypeScript, and MongoDB. However, even if you're new to these technologies, don't worry - this series will provide a comprehensive overview of our stack, including the most crucial aspects we'll be using along the way.
Why Nest.js
NestJS(we will use Nest often) is a popular framework for building efficient, scalable Node server-side applications. Some reasons why developers might choose NestJS for API development include its use of modern JavaScript and TypeScript, its modular architecture, you don’t have to care much about the architecture of your project since Nest provides modern patterns, and its ability to easily integrate with other common libraries and frameworks such as Express. Additionally, NestJS provides a powerful CLI that can be used to generate boilerplate code, which can be a time-saver, making it easier to get started with building an API. Overall, NestJS can make it easier for developers to build efficient and maintainable APIs in a relatively short amount of time, read more about the fundamental of Nest here.
Apart from what has been mentioned already, Nest has several advantages that make it a popular choice for building server-side applications, including:
Modular structure: Nest uses a modular architecture, which allows developers to organize their code into reusable modules and components. This makes it easy to build, test, and maintain large-scale applications.
TypeScript support: built with TypeScript, improves code organization and eliminates the need for manual type rewriting by addressing the challenge of consistent types across server, client, schema, and resolvers.
Built-in testing support: Nest comes with built-in testing support, making it easy to write and run unit tests for your application.
Strong performance: Nest uses Express.js under the hood, which means that it is built on a solid foundation and can handle a large number of requests.
Large and active community: Nest has a large and active community of developers, which means that there are plenty of resources and tutorials available to help you learn and troubleshoot.
Integrations: Nest easily integrates with other common libraries and frameworks such as Express, MongoDB, and Socket.io, which makes it easy to connect to databases and other services.
In our use case, we are building Graphql API and there are several reasons why Nest is the better choice for us:
It provides a powerful set of decorators and tools for implementing GraphQL resolvers, making it easy to define and organize the schema for a GraphQL API, that way we don’t have to write all from scratch ourselves, which makes us save countless time.
It allows you to use GraphQL in a modular way, which makes it easy to organize and test your GraphQL code, which we will see in the second part in practice.
It also provides the ability to easily integrate with the Apollo Server, which is a popular library for building GraphQL APIs.
Nest's modular architecture and support for GraphQL make it a great choice for building scalable and maintainable GraphQL APIs.
Too much talk, let’s see all of this in practice.
Setup your codebase
What are we going to build
Before starting with actual coding, it’s better to have an overview of what we are building. In our first parts, we will keep the app as basic as possible, while exploring the most important concepts of our stack.
We will build a bookstore application, the data model will look like the chart below:
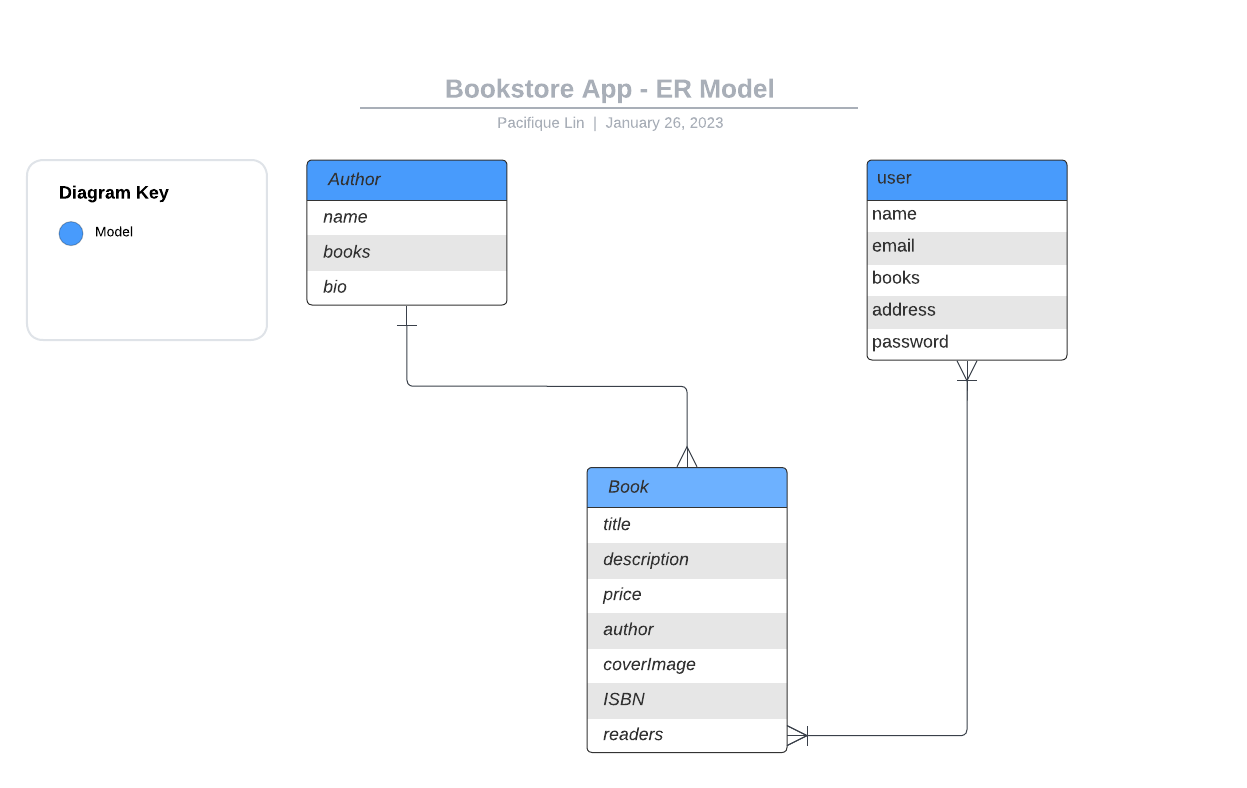
image1 - ER model
As you can see above, we have a simple Entity Relationship(ER) representing our bookstore database. This will be our starting point. These are the entities we have for now:
Book entity: representing a book, that has a title, a description, a price, an ISBN(International Standard Book Number), and an author, in MongoDB world, the author field will be a reference to pointing to the author model, containing the author’s object id. Read more about ObjectIds in MongoDB here.
Author entity: representing an author, we need information like name, bio and his books, and an array of references from the book model.
User entity: representing a customer, this will be the user of the bookstore app, he can create an account and purchase books for now.
Now, let’s set up the project …
Project setup
Before we start coding, please make sure to have node v14 or higher, nest CLI and yarn v.1.22 (our package manager).
You can check it all out now, to make sure you have all installed and running
$ node -v
# => outputs the node version currently installed
$ yarn -v
# => outputs the version of yarn
$ nest info
# => outputs information about the current nest CLI installed and its dependency, make sure the node version matches the version required by your CL
Once you have all the required packages, we can set up the codebase.
We create a new Nest project with the following command
$ nest new bookstoreApp
# choose yarn as a package manager, or the one you feel more comfortable with
The output should look like the screenshot below
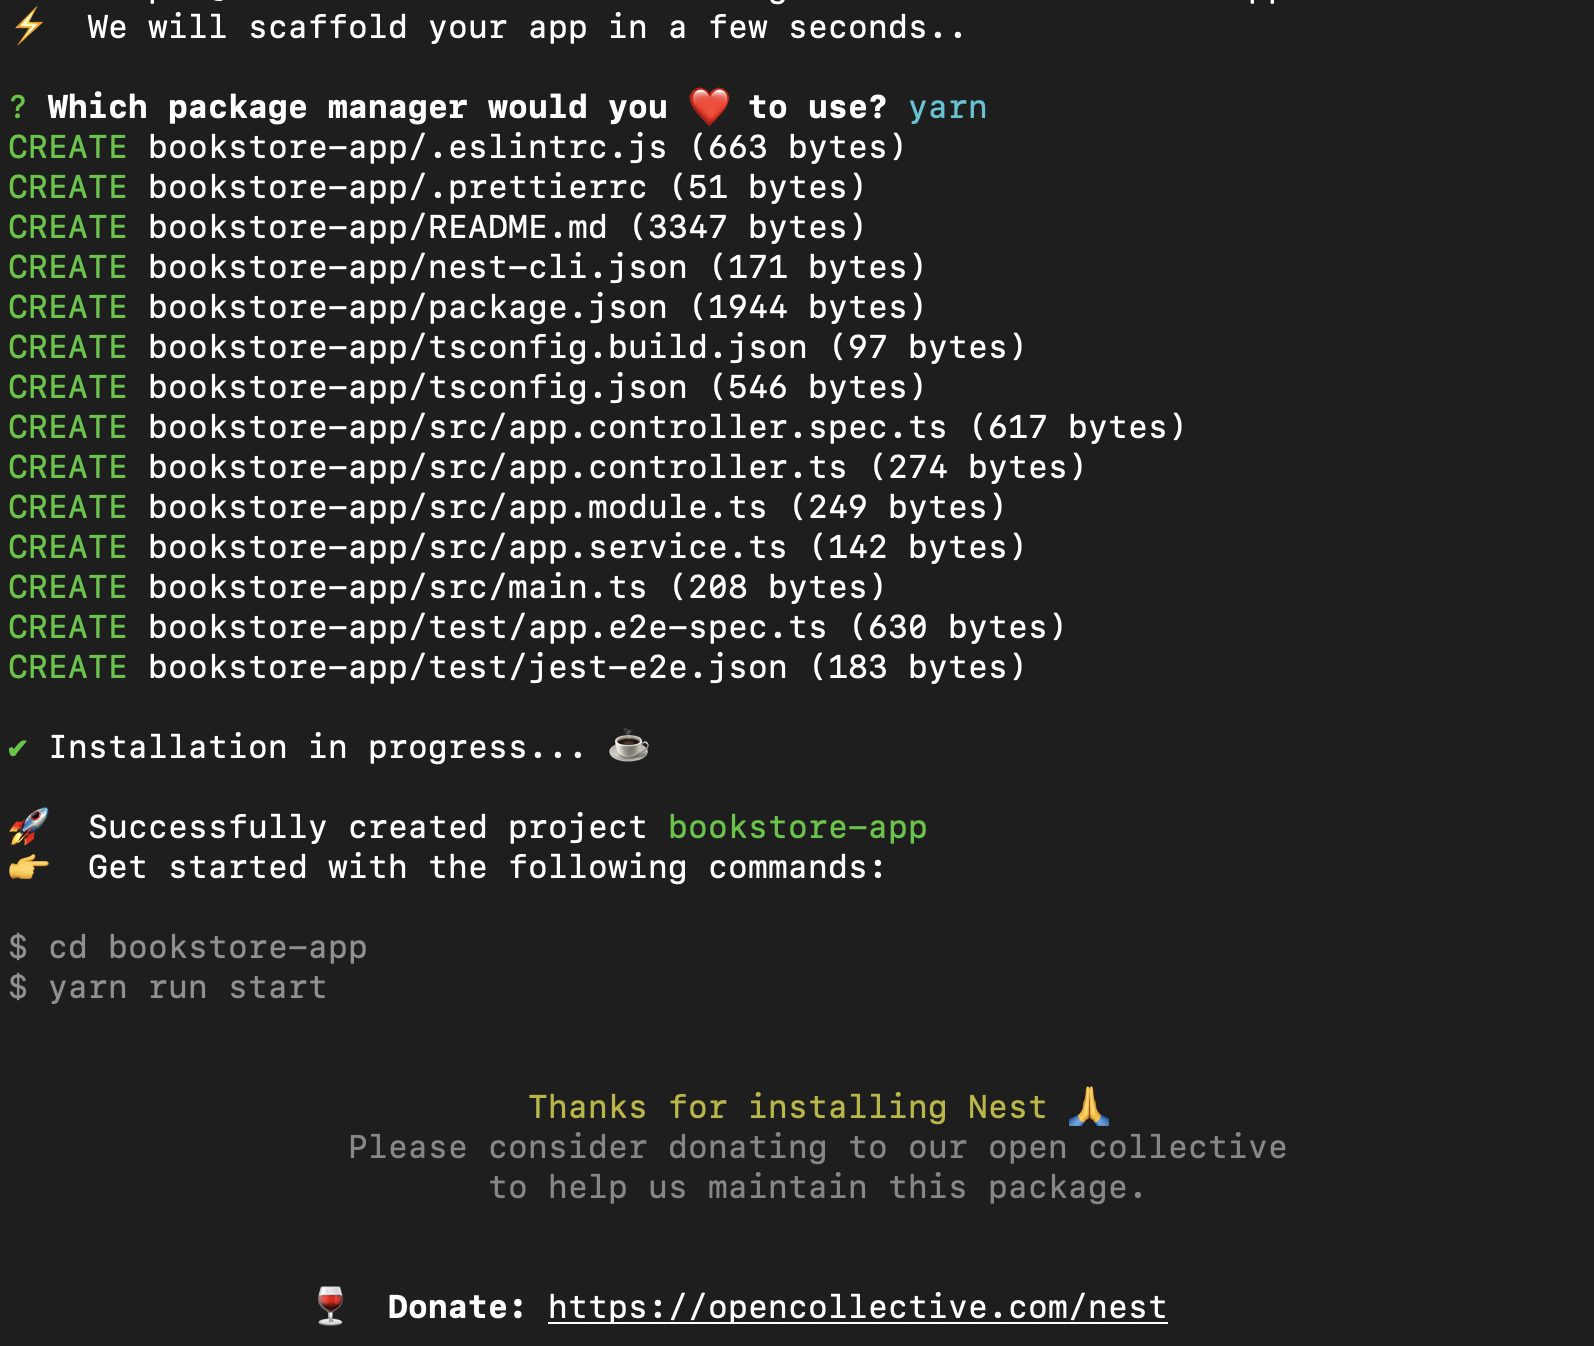
image2 - Create a new nest project, the output.
The scaffold created has the below structure
# PROJECT INITIAL STRUCTURE

├─ package.json
├─ src
│  ├─ app.controller.spec.ts
│  ├─ app.controller.ts
│  ├─ app.module.ts
│  ├─ app.service.ts
│  └─ main.ts
├─ test
│  ├─ app.e2e-spec.ts
│  └─ jest-e2e.json
├─ tsconfig.build.json
├─ tsconfig.json
└─ yarn.lock
In the code structure, we can notice that Nest also creates testing files under test/ directory, and the project is essentially written in typescript.
Let’s run the project generated for us, and see what we have:
# use the command below
$ yarn start
Then, go to localhost:3000 and make sure you GET Hello World!
Kudos, you have created a Rest API with Nest, let’s understand the nest architecture in detail now.
Understanding the Nest architecture
From the project structure, let’s dive into the nest architecture:
First, you may notice it has a package.json file, which makes it a node project, in addition, we have a tsconfig.json, which makes it a typescript project, then a yarn.lock file, as we chose to use yarn as a package manager. Under the hood, Nest has installed for us all the required packages to start the node environment.
Having a look at our package.json file, you will see that Nest CLI has installed a bunch of packages for us such as jest and @types/jest for testing, @types/express eslint, prettier, etc, which prevents us from installing them from scratch, making the developer save an important amount of time, still you can customize the .eslintrc.js and .prettierrc files, but what nest set for us is based on high-level standards and we mostly don’t have to touch those created files. You can also notice that Nest has configured jest for us, the project is ready to test, which we will explore more in our second part.
Nest has created an
src/folder for use, that is the place we will mostly work, still possible to customize it by your preferences, you can update thenest-cli.jsonfile and define a customsourceRootbut, as I said, what nest creates for us is inspired by most performant architecture so we really don’t have to touch those config files.In the src, let’s make a light update, let’s create a folder
src/appthen past all theapp.*.tsfiles there# from the project root, let's run $ mkdir src/app && mv src/app.*.ts src/app # this command will create the src/app folder, then it will paste all the app files insideThen rectify the import inside the
main.tsfile, fromimport { AppModule } from './app.module';toimport { AppModule } from './app/app.module';If you run your project again, you will see that the app is still running.The
app/app.module.tsfile currently looks like this:import { Module } from '@nestjs/common'; import { AppController } from './app.controller'; import { AppService } from './app.service'; @Module({ imports: [], controllers: [AppController], providers: [AppService], }) export class AppModule {}When I hover over the
@Moduledecorator, this is what I get: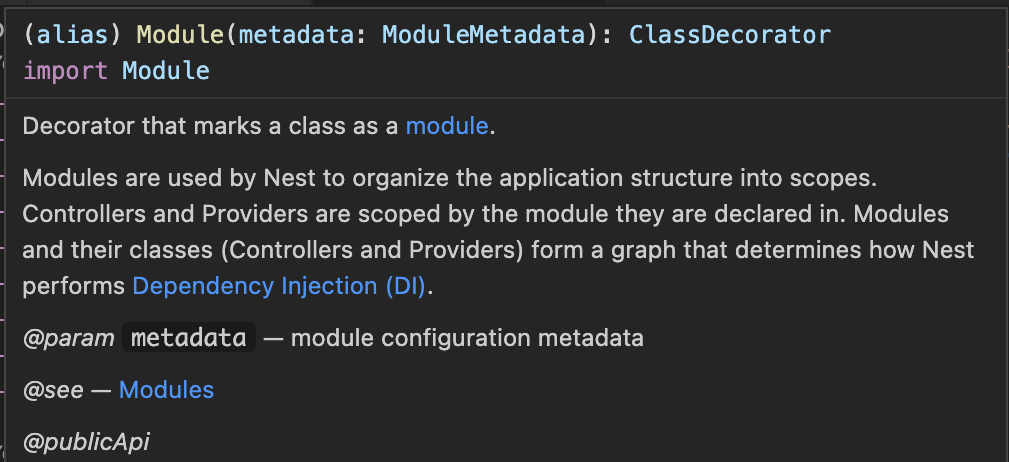
image3 - Module decorator
We can see that
@Modulereturns aClassDecoratornest/common has exported a lot of decorators just like @Module, which we will explore while building but, what is a decorator in Nest(or Angular, for Angular developers)?Based on the typescript official documentation, decorators are a feature of typeScript that is used to add metadata to a class, method, or property. This metadata can then be used by the Nest framework to perform various tasks, such as routing, dependency injection, and error handling.
In Nest, decorators are used to define controllers, services, pipes, guards, and more. Here are a few examples of decorators used in NestJS:
@Controller: Used to define a class as a NestJS controller. Controllers handle incoming HTTP requests and return appropriate responses, useful for Restful APIs.
@UseGuards: Used to apply one or more guards to a controller or route handler method. Guards can be used to protect routes or to perform authentication or authorization.
@Query: Used to define a property in a class as a GraphQL query.
@Mutation: Used to define a property in a class as a GraphQL mutation.
@Resolver: Used to define a class as a GraphQL resolver.
@Get: Used to define a method in a controller as a route handler for HTTP GET requests.
@Post: Used to define a method in a controller as a route handler for HTTP POST requests, useful for Restful APIs.
@UsePipes: Used to apply one or more pipes to a controller or route handler method. Pipes can be used to validate or transform incoming data.
@Injectable: Used to define a class as a service that can be injected into other parts of the application.
These are just a few examples, but there are many other decorators available in NestJS that can be used to perform various tasks, such as handling errors, injecting dependencies, and more, read more about decorators here.
This is an overview of the Nest architecture, as we build all of those aspects will become clearer and clearer.
From Rest to Graph
Currently, we have created a Rest API with one exposed endpoint, the GET defined in the src/app/app.controller.ts file, in this section, we will transition from the Rest API to Graphql API the painless way.
In our app.module.ts file, we have used the @Module decorator, diving into the Nest documentation, we understand that it provides metadata that Nest makes use of to organize the application structure, in other words, each Nest application has at least one Module to make it work, that we’ll call the root module, it’s our starting point, meaning, if we need to transform our API from Rest to Graph, we will need to detect and update our route module, in the way it starts listening only one endpoint, the graphql/.
Getting back to the module decorator, according to its documentation, a module can become a Provider to another module, all linked to the root module, the module-provider relationship is implementing a GRAPH data structure under the hood shown in the image below:
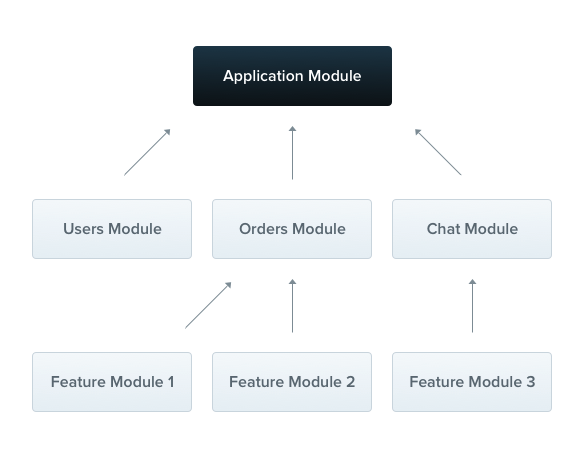
image3A - module-providers relationship - image credit:THE NEST OFFICIAL DOC
The module decorator takes a single object as a set of properties that defines the module, we will use those properties to transform our API into a graphql, the most important ones for now are:
imports: the list of imported modules that export the providers which are required in this module.providers: the providers that will be instantiated by the Nest injector and that may be shared at least across this module.controllers: the set of controllers defined in this module that have to be instantiated.
Let’s go ahead and improve our root module so that our app will become a graphql app:
In the
importsarray, let’s use theGraphQLModuleexported from@nestjs/graphqlpackage, after the required packages below.# install the required packages $ yarn add @nestjs/graphql @nestjs/apollo graphql apollo-server-express apollo-server-coreThen, in the
app/app.module.tsfile, change the emptyimportsarray to:// app/app.module.ts imports: [ GraphQLModule.forRoot<ApolloDriverConfig>({ driver: ApolloDriver, autoSchemaFile: join(process.cwd(), 'src/schema.gql'), playground: false, plugins: [ApolloServerPluginLandingPageLocalDefault()], }), ],With
GraphQLModuleimported from@nestjs/graphql,ApolloDriverandApolloDriverConfigfrom@nestjs/apollo, join frompath, andApolloServerPluginLandingPageLocalDefaultfromapollo-server-core.In the GraphQLModule. we have added a couple of other properties:
By setting the autoSchemaFile property to
join(process.cwd(), 'src/schema.gql'), we can use the code-first approach instead of the schema-first approach. This way, Nest will automatically generate our schemas based on our model classes. We've chosen to store the schema file in thesrc/schema.gqllocation, but you can also let Nest determine the location by simply setting autoSchemaFile to true. To learn more about the pros and cons of the schema-first vs code-first approach, you can check out this resource.playground: set to
falseTo useApollo Sandboxinstead of thegraphql-playgroundas a GraphQL IDE for local development.plugins: we need to define it as ApolloServerPluginLandingPageLocalDefault based on the playground value, if it’s set to true, we don’t necessarily need to add it as part of our plugins.
Then, let’s rename the
app.controller.tsfile toapp.resolver.tsand just enter the code below:// app/app.resolver.ts import { Query, Resolver } from '@nestjs/graphql'; import { AppService } from './app.service'; @Resolver() export class AppResolver { constructor(private readonly appService: AppService) {} @Query(() => String) getHello(): string { return this.appService.getHello(); } }From the previous content, we can see these differences:
The
@Controllerdecorator has been changed to@ResolverThe
@Getdecorator by@Query(() => String)
But everything else remains exactly the same.
Let’s now get back to our app.module.ts file, and fix the imports
Change the import of the controller, we no longer have one, we have a resolver instead
Remove the
AppControllercontroller from thecontrollersarray,Add the
AppResolverin theprovidersarray along withAppService
Our file now looks like the following:
    import { Module } from '@nestjs/common';
    import { AppResolver } from './app.resolver';
    import { AppService } from './app.service';
    import { GraphQLModule } from '@nestjs/graphql';
    import { ApolloDriver, ApolloDriverConfig } from '@nestjs/apollo';
    import { join } from 'path';
    import { ApolloServerPluginLandingPageLocalDefault } from 'apollo-server-core';

    @Module({
      imports: [
        GraphQLModule.forRoot<ApolloDriverConfig>({
          driver: ApolloDriver,
          autoSchemaFile: join(process.cwd(), 'src/schema.gql'),
          playground: false,
          plugins: [ApolloServerPluginLandingPageLocalDefault()],
        }),
      ],
      controllers: [],
      providers: [AppService, AppResolver],
    })
    export class AppModule {}
That way, we have transformed our initial Rest API into a Graphql one, in a few steps, easy to follow.
Let’s run the app once again and confirm that our API is now Graphql API
# Let's run the app in dev mode
$ yarn start:dev
Let’s go at http://localhost:3000/graphql
This is what we normally get:
image4A
Let’s query our server, we currently have only one Query, the getHello, if you were following along, everything should be running like on the image below

image4B - Our graphql API running 🚀
Kudos, our API is running, let’s now configure our database.
Setup database and environment variables
You can get the codebase for the previous part by checking out the commit
#4db24a
As announced, we will use MongoDB for our database, make sure you have configured a mongo cluster here and you have a DATABASE_URL ready to process.
To add MongoDB configuration to our project, we will use the MongooseModule module imported from @nestjs/graphql then we will configure environment variables to retrieve the DATABASE_URL variable.
Create a .env file and add there the key DATABASE_URL with the value you got from your cluster before we continue.
When working with NodeJS applications, it's common practice to use .env files to store key-value pairs for different environments. This makes it easy to switch between environments by simply swapping in the appropriate .env file.
A great way to implement this technique in a Nest application is to create a ConfigModule that provides access to a ConfigService. This service loads the appropriate .env file for the current environment. Although you could choose to build this module yourself, Nest offers the convenient @nestjs/config package out-of-the-box. We'll dive into this package in this section.
Let’s get started by installing the required packages:
# install required packages
$ yarn add @nestjs/mongoose @nestjs/config mongoose
Then, we will inject the MongooseModule module into our root module, as we are getting used to Nest syntaxes, the way we will inject it will look similar to how we did with the GraphQLModule previously.
In the app.module.ts file, let’s add this line, in the imports property of our root module:
// app/app.module.ts
...
MongooseModule.forRoot('YOUR_DATABASE_URL'),
...
The forRoot method takes the same parameters as the mongoose.connect() method, in this case, we are passing in the URL for our database.
Instead of hard-coding the URL, we can use the DATABASE_URL from our **.**env file.
We have installed the @nestjs/config package, which is a built-in package that exposes the ConfigModule**, w**e will use this in our root module, to configure the preload of our .env file with its variables.
By adding ConfigModule.forRoot() in the imports property of our root module, we are loading and parsing a **.**env file from the default location (the project root directory). This merges key/value pairs from the **.**env file with environment variables assigned to process.env. The result is stored in a private structure that can be accessed through a ConfigService instance. We don't need to create this service ourselves, as @nestjs/config takes care of it for us.
As we are loading environment variables, the connection to the MongoDB database will no longer be synchronous. To achieve an asynchronous connection, we will use the forRootAsync method instead of forRoot().
We will then use a factory provider to inject dynamic configuration, such as a dynamic database URL, into our mongoose.connect() function. I recommend looking at this resource to understand how to customize providers using the useFactory syntax.
Combining the information above, let’s update the imports property of our root module, here is how it should look now:
// app/app.module.ts
...
imports: [
    GraphQLModule.forRoot<ApolloDriverConfig>({
      driver: ApolloDriver,
      autoSchemaFile: join(process.cwd(), 'src/schema.gql'),
      playground: false,
      plugins: [ApolloServerPluginLandingPageLocalDefault()],
    }),
    MongooseModule.forRootAsync({
      imports: [ConfigModule],
      inject: [ConfigService],
      useFactory: (configService: ConfigService) => {
        const options: MongooseModuleOptions = {
          uri: configService.get<string>('DATABASE_URL'),
        };

        return options;
      },
    }),
    ConfigModule.forRoot({
      cache: true,
    }),
  ],
...
You can see that we've injected the ConfigService from the @nestjs/config package into the MongooseModule. This service contains a private structure that stores the key/value pairs from the .env file. Restart the server and ensure that the app is running.
In the same way we've injected environment variables into the root module, we can do the same for other modules throughout the app. We're slowly diving into the most important aspects of the Nest framework, great job!
Currently, this is how our root module looks like:
import { Module } from '@nestjs/common';
import { AppResolver } from './app.resolver';
import { AppService } from './app.service';
import { GraphQLModule } from '@nestjs/graphql';
import { ApolloDriver, ApolloDriverConfig } from '@nestjs/apollo';
import { join } from 'path';
import { ApolloServerPluginLandingPageLocalDefault } from 'apollo-server-core';
import { ConfigModule, ConfigService } from '@nestjs/config';
import { MongooseModule, MongooseModuleOptions } from '@nestjs/mongoose';

@Module({
  imports: [
    GraphQLModule.forRoot<ApolloDriverConfig>({
      driver: ApolloDriver,
      autoSchemaFile: join(process.cwd(), 'src/schema.gql'),
      playground: false,
      plugins: [ApolloServerPluginLandingPageLocalDefault()],
    }),
    MongooseModule.forRootAsync({
      imports: [ConfigModule],
      inject: [ConfigService],
      useFactory: (configService: ConfigService) => {
        // CHECK IF YOU GET WHAT IS EXPECTED
        console.log('ENV VAR', configService.get('DATABASE_URL'));

        const options: MongooseModuleOptions = {
          uri: configService.get<string>('DATABASE_URL'),
        };

        return options;
      },
    }),
    ConfigModule.forRoot({
      cache: true,
    }),
  ],
  controllers: [],
  providers: [AppService, AppResolver],
})
export class AppModule {}
Now, let's start building the other modules of the app.
You can get the codebase for the previous part by checking out the commit
#812bc3
Create modules
At this part, we have done most of the setup, now we will mostly code.
From our ER diagram, we have 3 modules, let’s create those modules in the most scalable way.
The User Module
We will use the Nest CLI to generate our modules, let’s start with the user module, by running the code below at the root of our project
 # generate the user module
 # to the question 'What transport layer do you use?' choose GraphQL (code first)
 # to the question 'Would you like to generate CRUD entry points?' reply with y
 $ cd src/app && nest g resource user
Wow 🤩 , Nest has done all the heavy lifting for us by providing a solid foundation for our user resource! This is incredibly powerful and allows us to focus on the implementation rather than worrying about architecture or any other complex issues. How amazing is that! Is our app still working? Of cause, Nest is our biggest friend, he can’t break it.
Take a few moments to have a look at the generated files, as we start customizing those files.
As we have generated the CRUD entry point, after running the app, we can see that our
schema.gqlfile is updated to something like the following(code-first):# ------------------------------------------------------ # THIS FILE WAS AUTOMATICALLY GENERATED (DO NOT MODIFY) # ------------------------------------------------------ type User { """Example field (placeholder)""" exampleField: Int! } type Query { getHello: String! users: [User!]! user(id: Int!): User! } type Mutation { createUser(createUserInput: CreateUserInput!): User! updateUser(updateUserInput: UpdateUserInput!): User! removeUser(id: Int!): User! } input CreateUserInput { """Example field (placeholder)""" exampleField: Int! } input UpdateUserInput { """Example field (placeholder)""" exampleField: Int id: Int! }We have a folder called
dto/under our generateduserresources directory which holds our DTO (Data Transfer Object) files. A DTO defines how data is sent over the network. We can define the DTO schema using TypeScript interfaces or classes. Nest documentation suggests using classes over interfaces as they are part of the JavaScript ES6 standard and will be preserved as real entities in the compiled JavaScript. TypeScript interfaces, however, are removed during transpilation, making them inaccessible to Nest at runtime.You'll notice that Nest has automatically generated these queries and mutations for us. Now, let's customize the user resource files to suit our needs.
We'll begin by modifying the
app/user/entities/user.entity.ts**** file to define our user model. Replace the existing code with the code provided below:import { ObjectType, Field } from '@nestjs/graphql'; import { Document, Schema as MongooSchema } from 'mongoose'; import { Prop, Schema, SchemaFactory } from '@nestjs/mongoose'; @ObjectType() @Schema() export class User { // We are using the @Field() decorator in addition to the @Prop() one to specify that the class propery is a GraphQL field // In other words, that decorator isn't necessary for Rest APIs @Field(() => String) _id: MongooSchema.Types.ObjectId; // Add user properties @Field(() => String) @Prop() name: string; @Field(() => String) @Prop({ unique: true }) email: string; @Field(() => String) @Prop() password: string; @Field(() => String) @Prop() address: string; // TODO: ADD RELATIONSHIP TO THE BOOK MODEL } export type UserDocument = User & Document; export const UserSchema = SchemaFactory.createForClass(User);According to the
@nest/mongoosedocumentation, we use the@Prop()decorator to define fields in a data module. This decorator can take several properties, such as whether a field is required or unique. For example, we set the email field as unique to prevent duplicate accounts. We will explore other properties later on. You can learn more about them by visiting the documentation.In addition to the necessary
@Propdecorator, we also have the@Field()decorator from@nest/graphql. This will help generate our schema file and indicate to our API that the specific field is a GraphQL one.Now, let's update our DTO files. They are similar to the
entityfiles, but since they're not MongoDB fields, we don't use@Propsdecorators. 🛠️ Let's update the DTO files to look like the following:
image4 - create-user dto
image5 - update-user dto
image6 - update-password dto
As we are on DTOs, I have added the last one, which will take care of updatePassword inputs. We are using
PartialTypefrom@nestjs/graphqlinto theUpdateUserInputclass to make sure all the fields that the CreateUserInput contains will be available here, but optional, you can read more about Partial utility types, a typescript feature here.Are you ready for some serious code-slinging action? We're about to dive into the nitty-gritty of business logic and, let's be real, it's not rocket science. Most of this stuff is inspired by the
@nestjs/mongoosedocumentation, so if you're ever feeling lost, just give it a quick peek. But don't worry, with everything we've covered so far, you've got this in the bag.🛠️ Now, let’s together update the
user.service.tsanduser.resolver.tsfiles like following: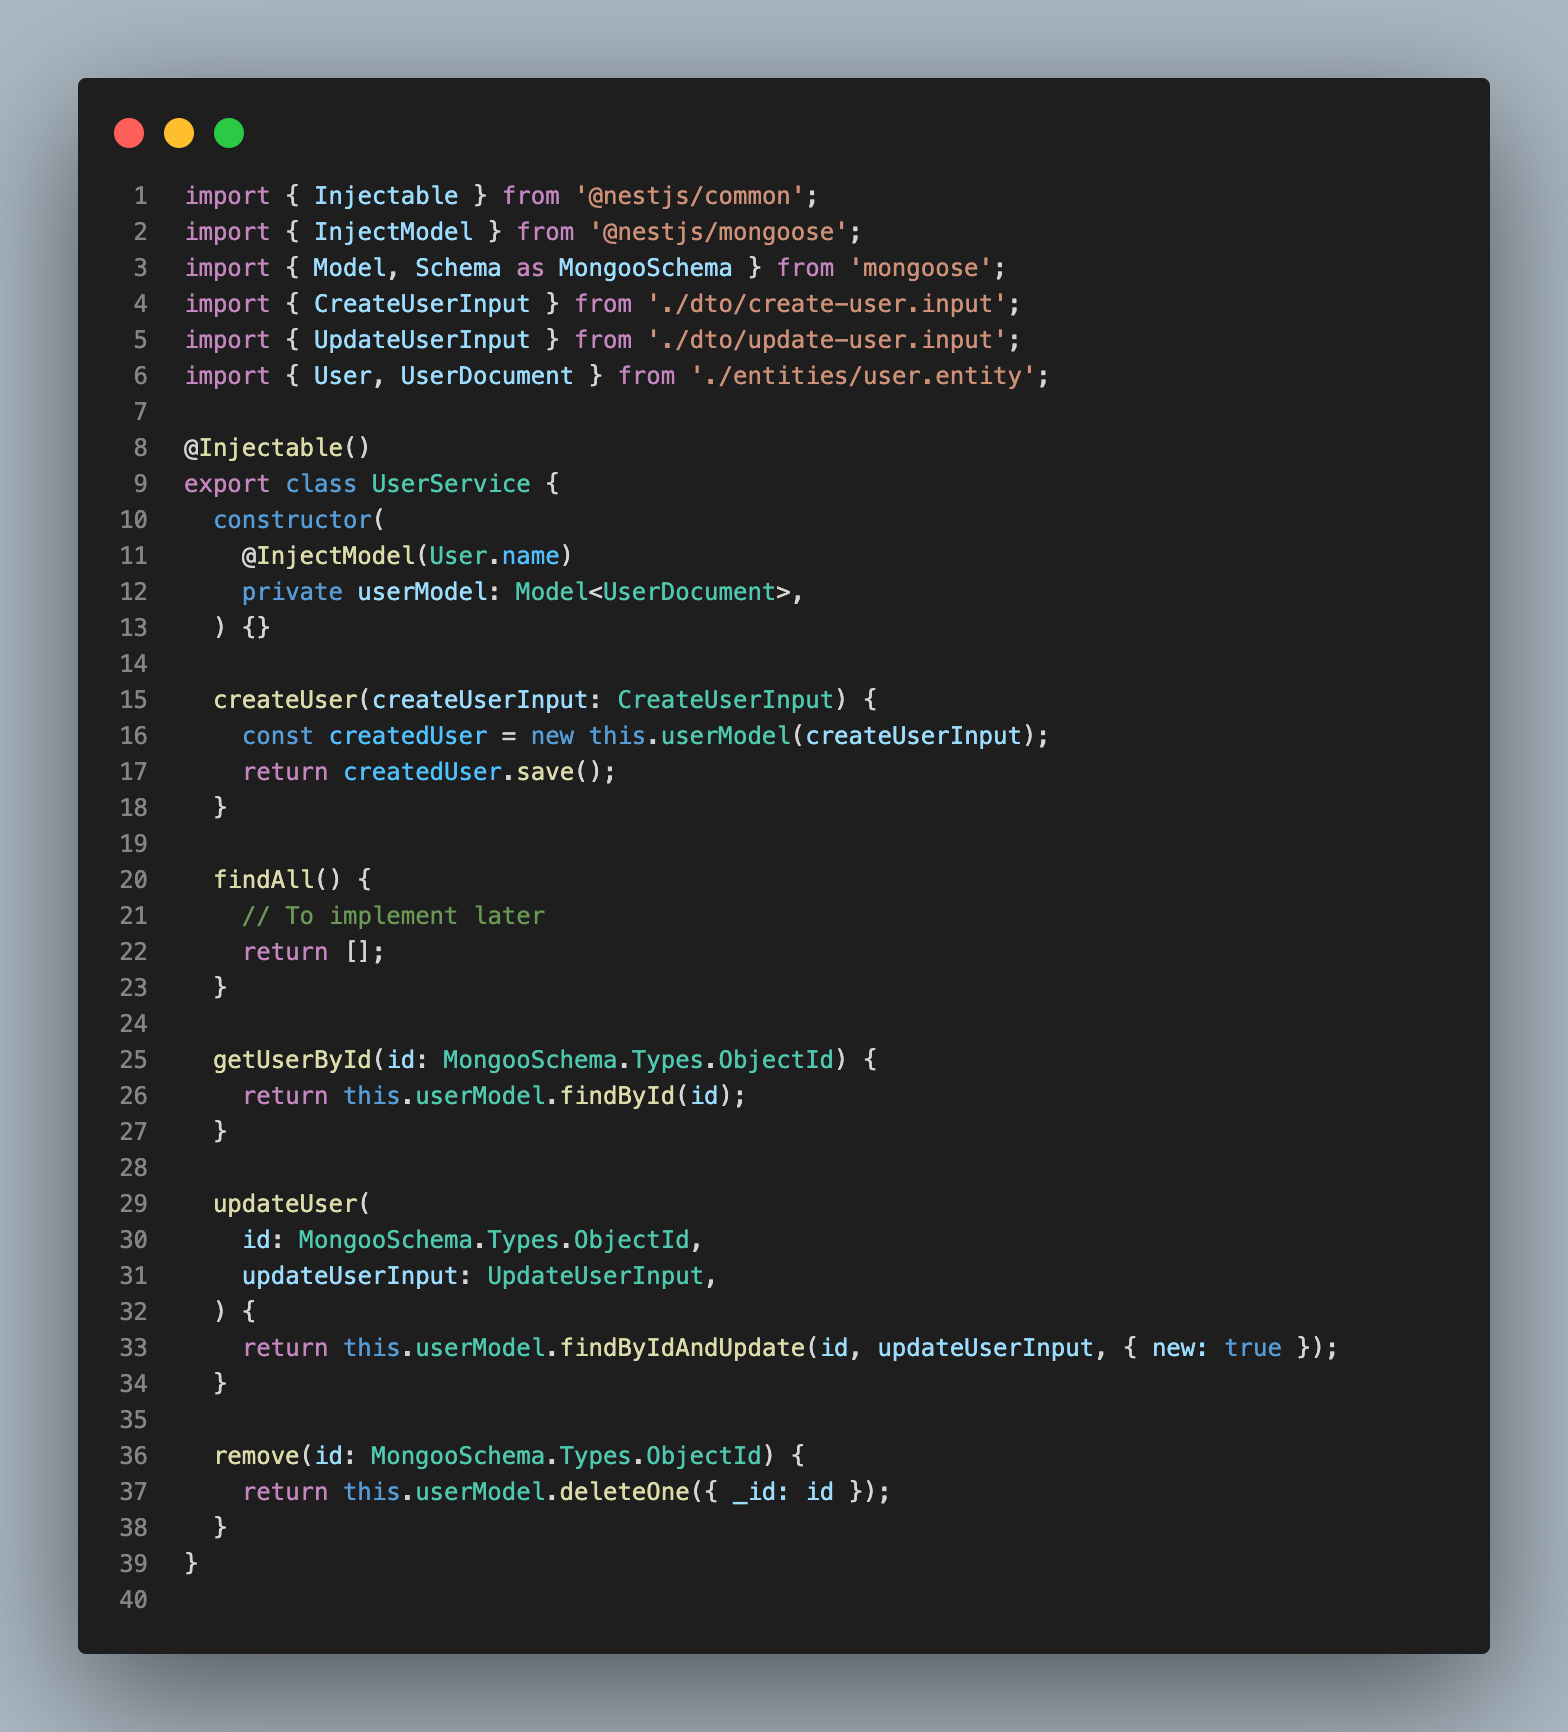
image7 - user.service updated
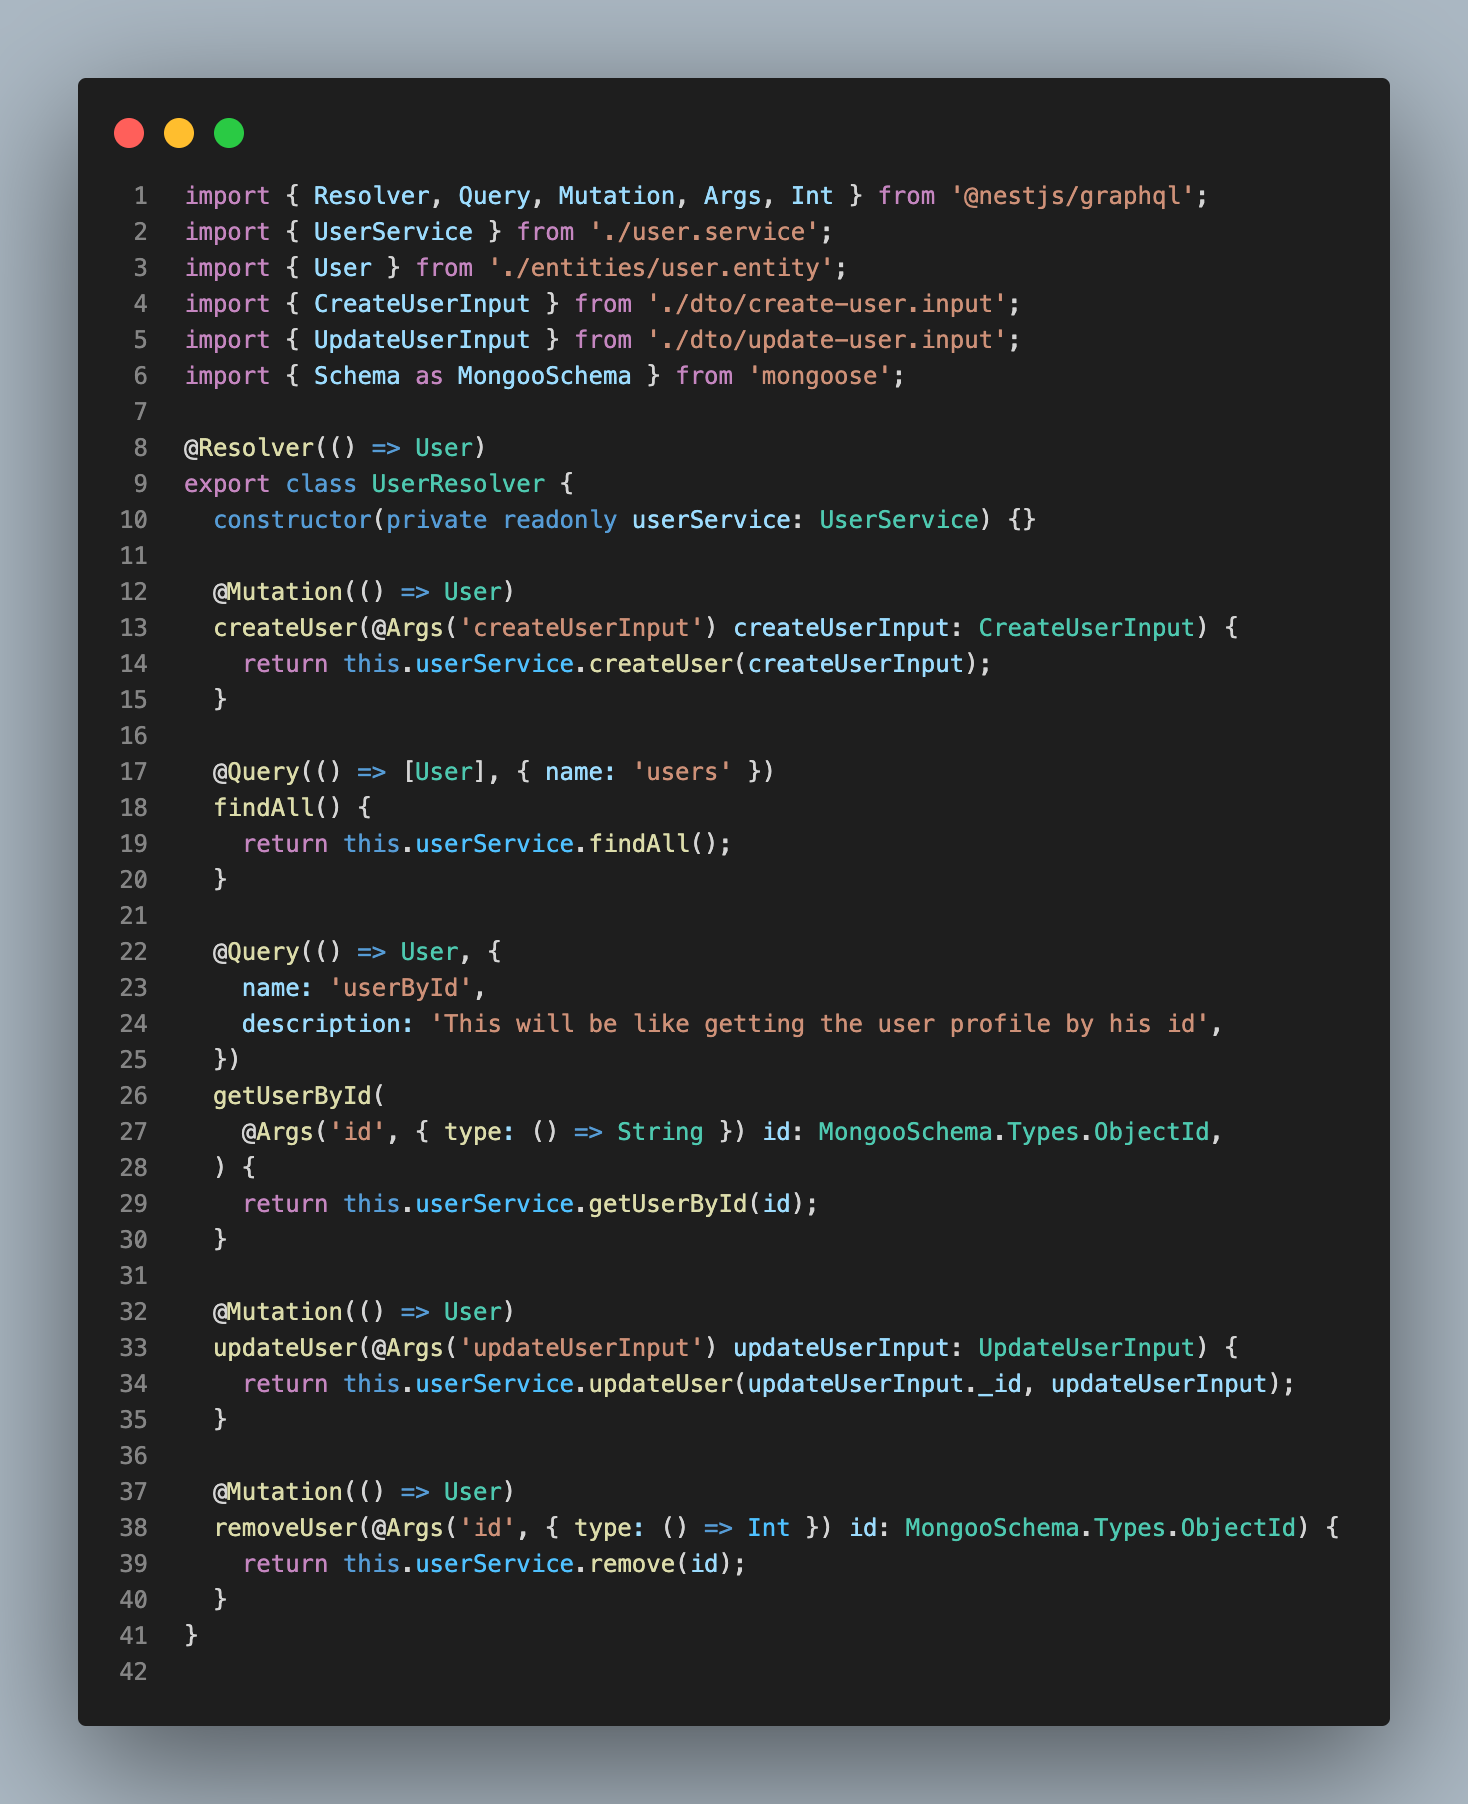
image8 - user-resolver.ts updated
Alright, it's getting spicy now that we have more than one mutation and query. But don't worry, the code may look like gibberish but it's quite simple. Just pay attention to a couple of details, like making sure your custom
nameproperties are unique, otherwise, GraphQL will ignore the first one and you'll end up with a bunch of confused developers.And if things still seem a little murky, don't hesitate to add some helpful descriptions to your resolvers. Trust me, it'll make things much clearer for everyone.
🛠️ Update our
user.modulefile to reflect these changes and make sure we're injecting the user model and exporting it to the root module. Give it a shot, you got this! 🤘 You can check out#c4acf4to verify.After running the app once again, make sure everything is working just perfectly, the generated
schema.gqlshould look like the following: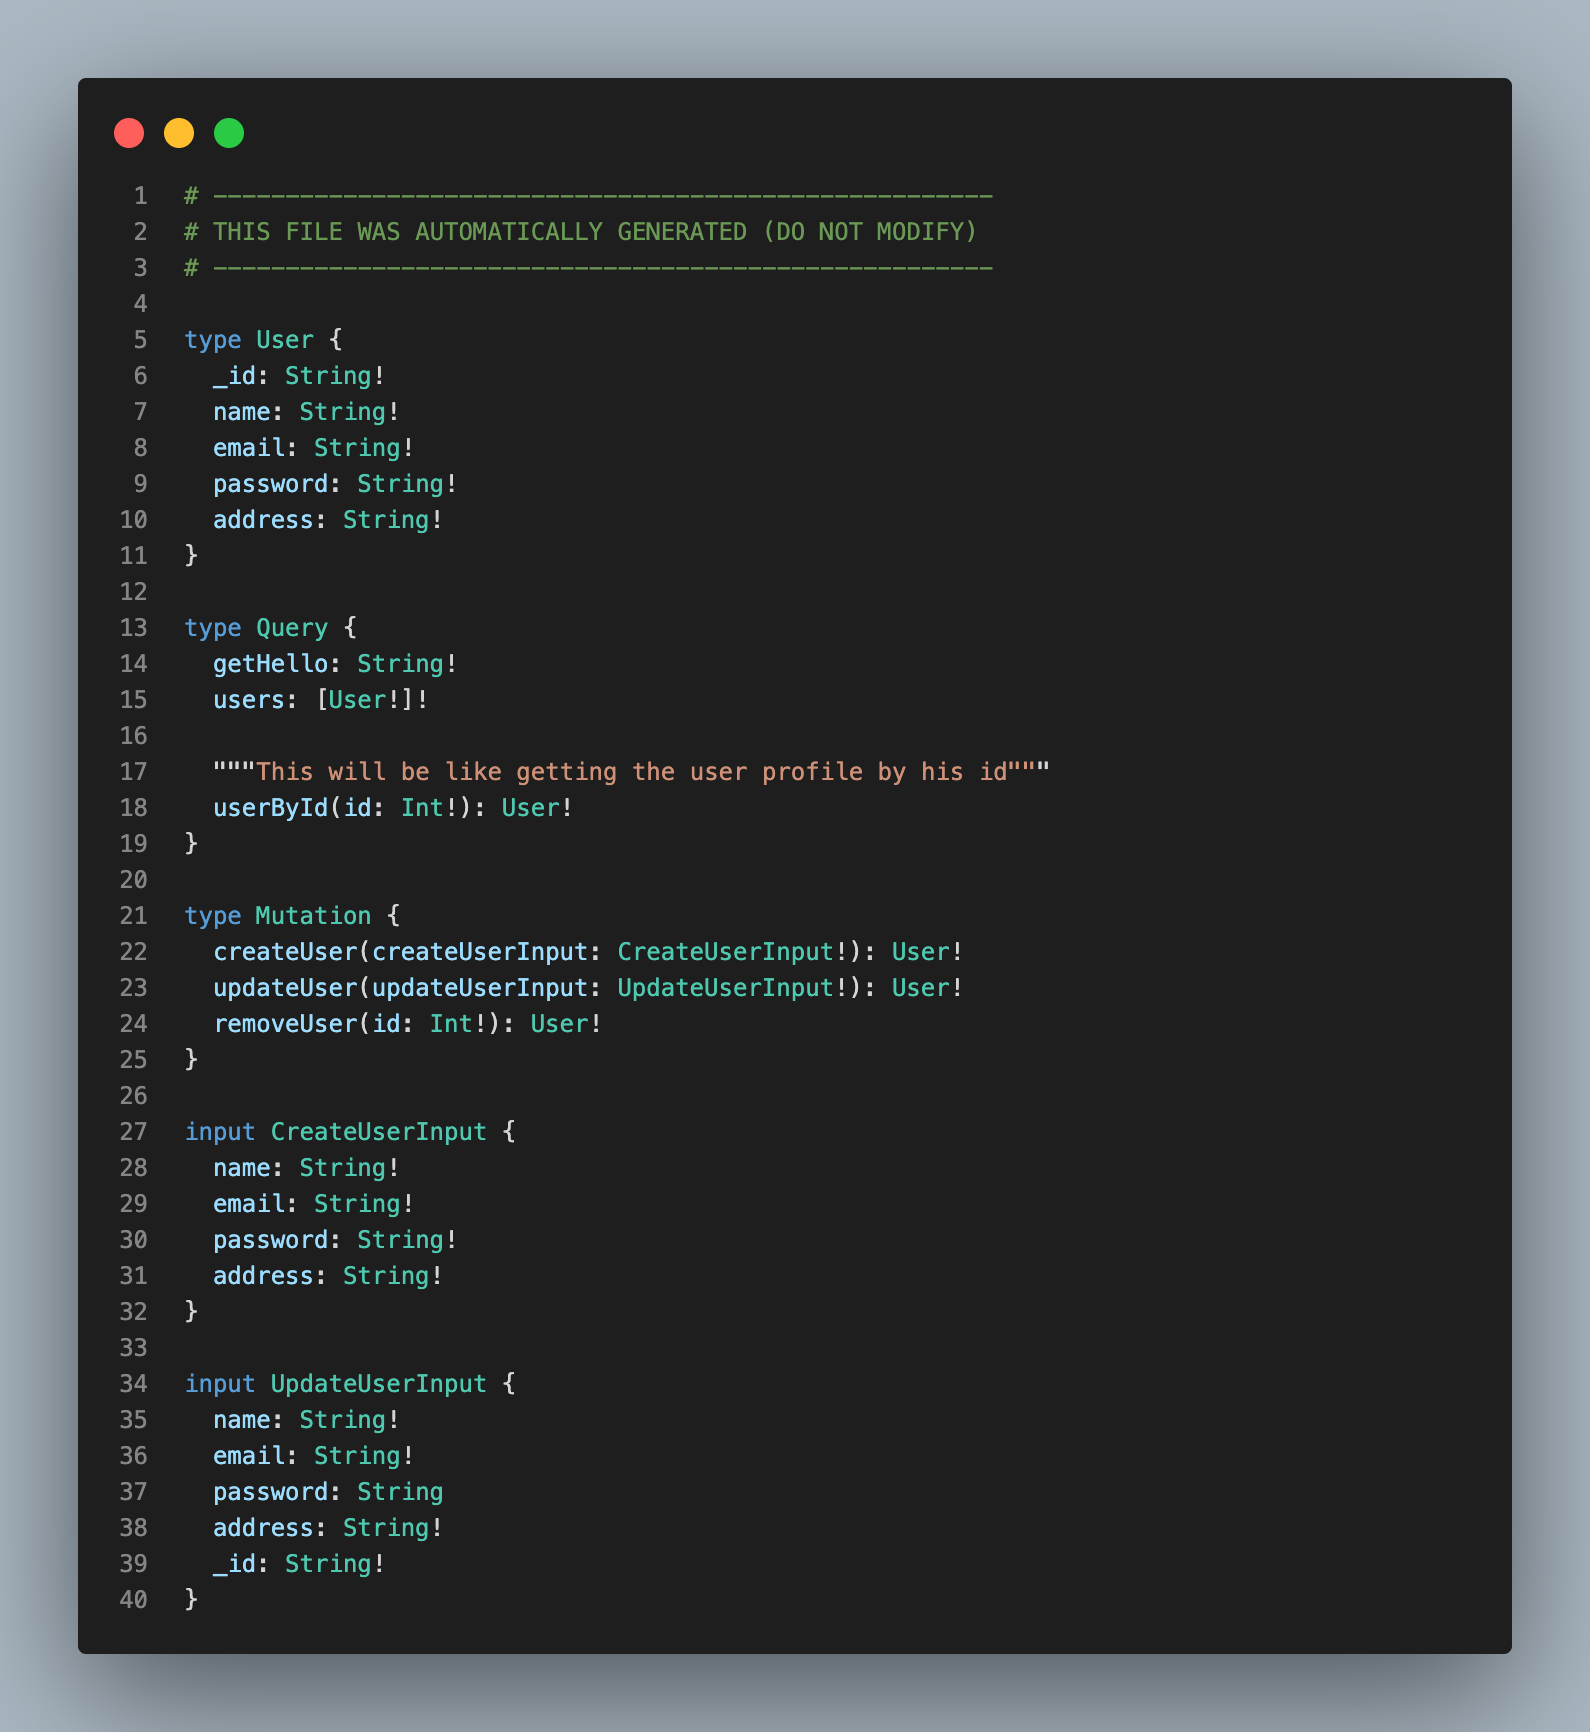
image9 - schema.gql file
Let’s try it out and create a first user
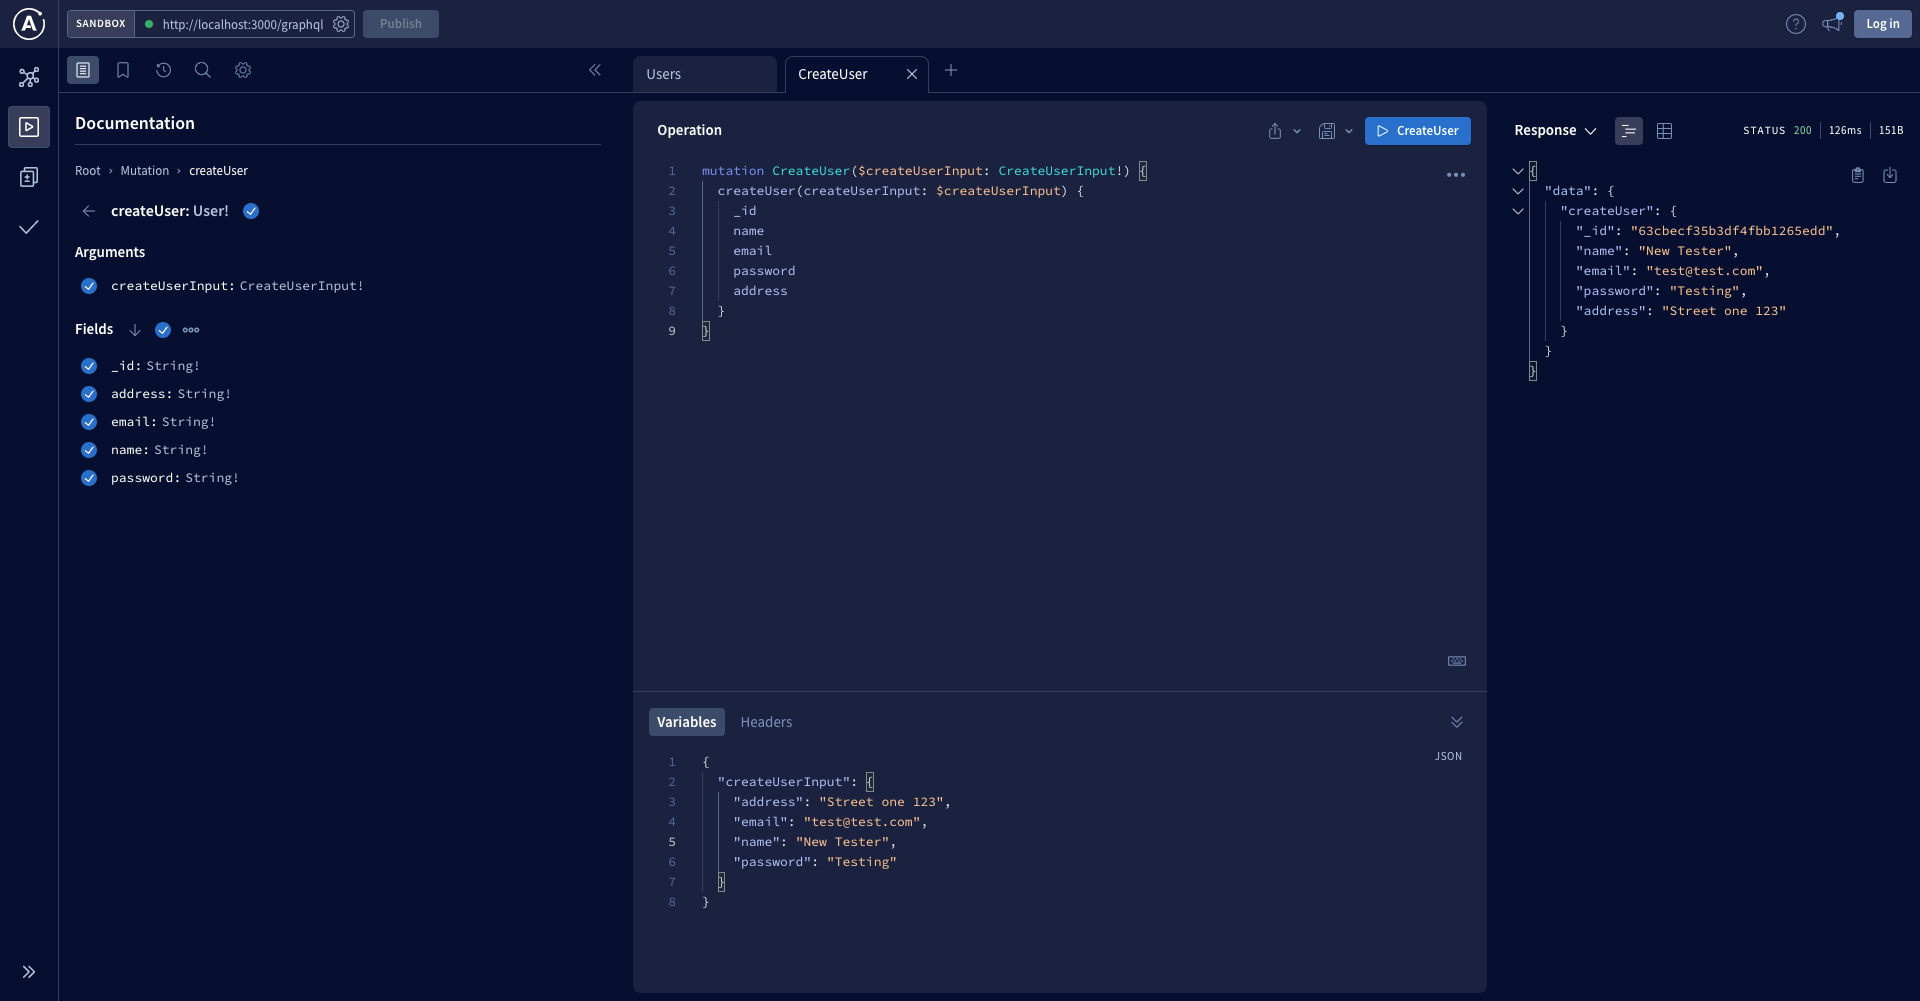
image10 - Create user mutation
You should be able to make all the CRUD operations, I know a password should never be stored the way we are doing, be patient, and the section after will all be about security.
Before we move forward to the security section, let’s do the same for book and author modules.
First, let’s generate the resources using nest CLI
 # From the root of the project, let's run
 $ cd src/app && nest g resource book && nest g resource author
This also does the exact same thing we saw before.
Alright, it's time to spruce up our DTOs, entities, services, and modules. Take a gander at
#20d186to see the shiny new structure we've got going on. And don't worry if it all seems a bit confusing at first, just take a break and try replicating it yourself. Because as they say, practice makes perfect... or at least passable 😎.However, it’s important to talk about few aspect we customized:
I have added a
commonmodule atapp/common/with only dto files, that module aims to have shared logic undercommon/serviceand export them through its root module. For those dto, let’s briefly talk about theget-paginated.args.tsfile As we may have a lot of books, authors, or user, theirfindAllmethods under their respective services need to send paginated data, we have defined arguments responsible for calling those resources as following.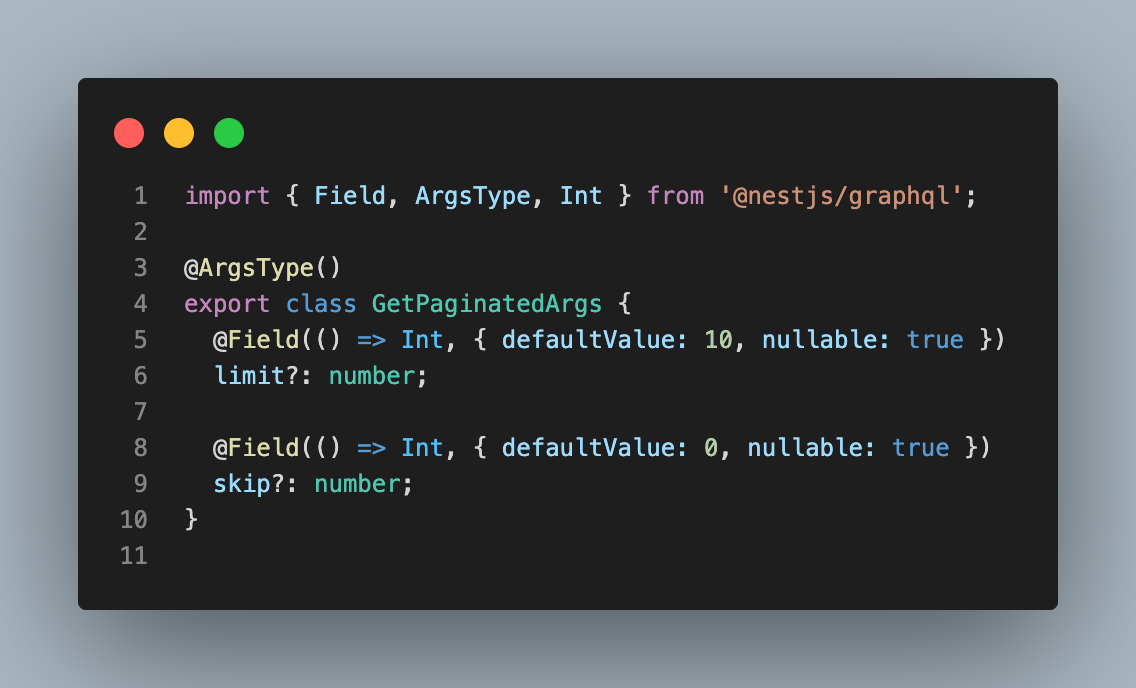
image11 - get-paginated.args.ts file
As you can see here, instead of calling limit and skip everywhere we have paginated queries, we decided to put it in a single place, then call the
GetPaginatedArgsas query’s argument, you can see a sample of place it’s used in thebook.resolver.tsfile: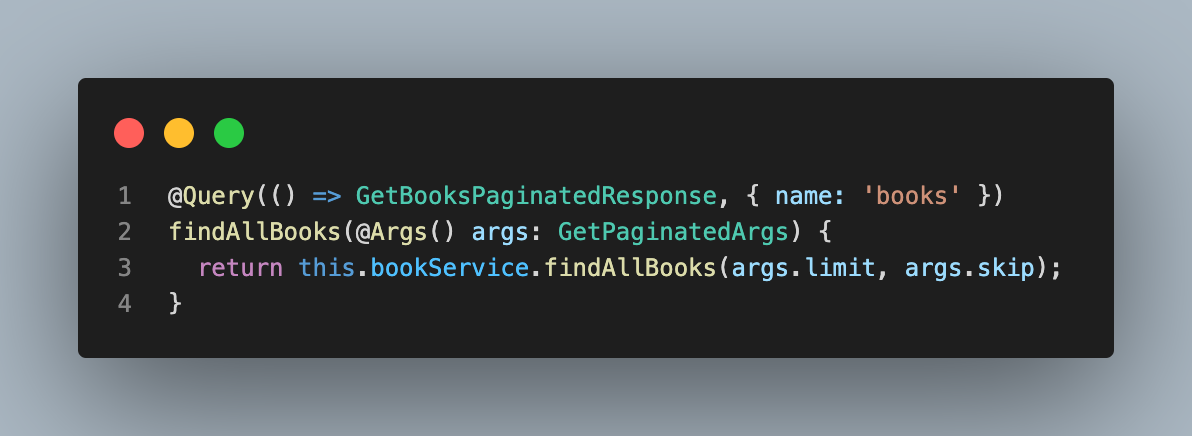
image12 - GetPaginatedArgs
The query we have above sends a response of type
GetBooksPaginatedResponsefor this specific query, we need to return a list ofargs.limit(by default the limit is 10) books but also we need to know how many books we have in the book collection, this is so helpful for the frontend team to build their pagination component, let’s now see what we have for in our books.service.ts file: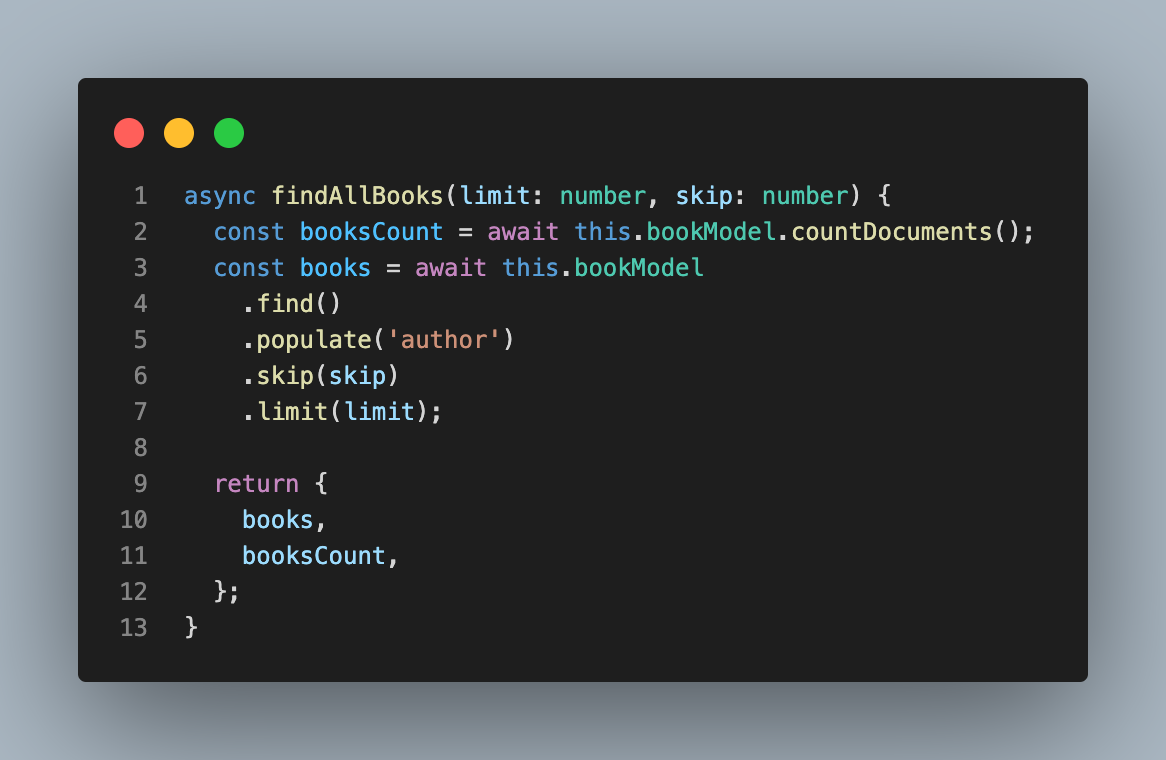
image13 - findAllBooks method
You can notice that we are sending a response of type
GetBooksPaginatedResponsedefined in thebook/entity/book.entity.tsfile.Get ready to dive into the exciting world of relationships! We're going to take a closer look at how we've defined the many-to-many relationship between our user and book models. When a user purchases a book, they become a reader for that book and that book becomes part of the user's collection. It's like magic! See the code below and get ready to amaze yourself. If you want to learn more about relationships in
@nest/mongoose, check out the documentation here, it's worth the read!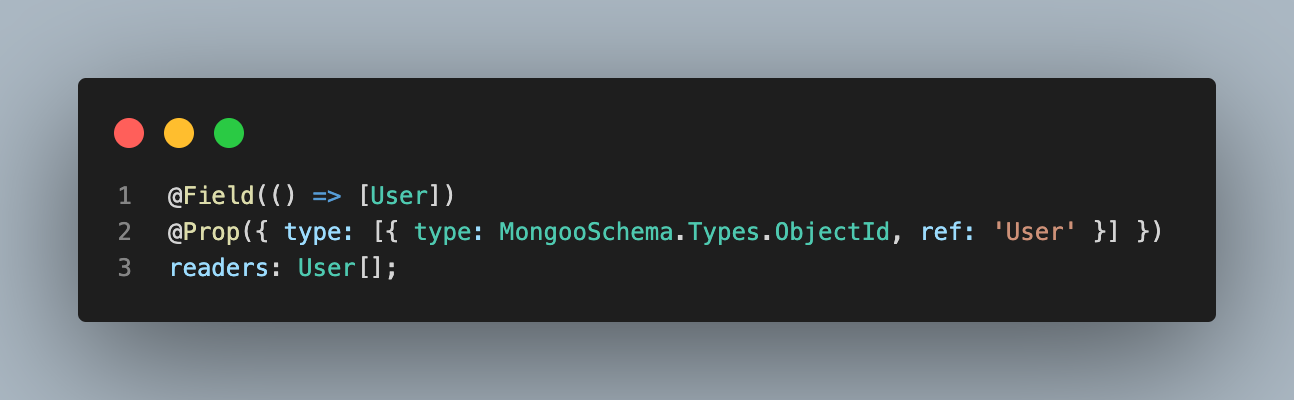
book.entity.ts
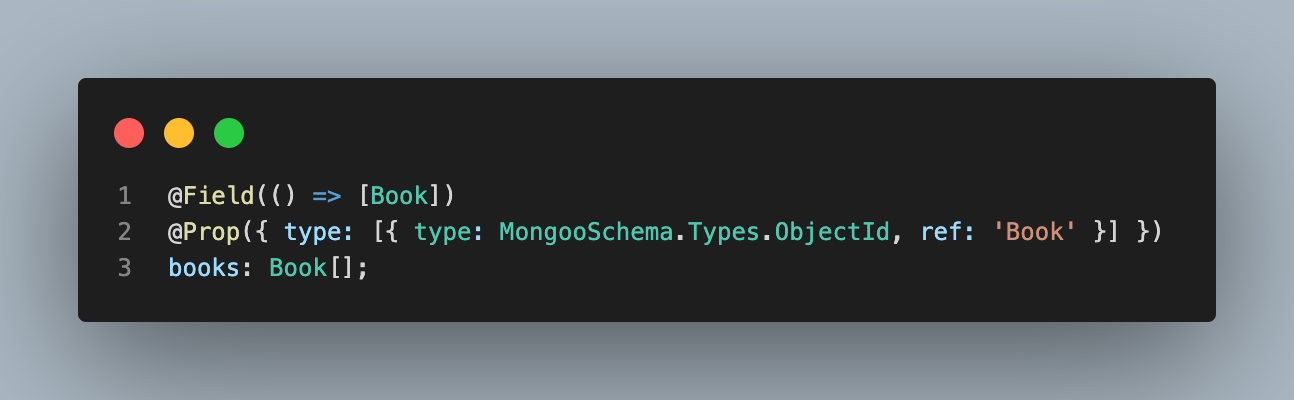
user.entity.ts image14 - Book - User many-to-many relationship
Amazing, we have done a lot so far, using a replication of the code we have at #20d18, restart the server once again and make sure it runs correctly.
Congrats, our API is growing and we can be proud of ourselves 🤩
Security in Nest
You can get the codebase for the previous part by checking out the commit
#20d18
Now let’s talk about one of the most crucial parts of API development: SECURITY.
Everything we have done so far is great, we have been able to achieve a lot, but our app is dangerous for clients, let’s protect them.
According to the nest documentation, there are several ways to secure NestJS GraphQL APIs:
Authentication: Use JSON Web Tokens (JWT) or OAuth2 to authenticate users and secure their data. NestJS has built-in support for JWT authentication, we should be able to keep the user’s secret credentials(like the user’s password) encrypted and inaccessible.
Authorization: Use GraphQL directives to limit access to specific fields and operations based on user roles and permissions, for example, in our case not every user should be able to add books in the store, or only authenticated users should retrieve books, etc. NestJS has built-in support for GraphQL directives.
Input validation: Use the built-in validation decorators to validate user input and prevent malicious attacks.
CORS: Enable CORS(Cross-Origin Resource Sharing) to prevent cross-site scripting (XSS) attacks. NestJS has built-in support for CORS.
Rate Limiting: Limit the number of requests a user can make to prevent DDoS(distributed denial-of-service) attacks and abuse. NestJS has built-in support for rate limiting.
HTTPS: Use HTTPS to encrypt communication between the client and server and prevent man-in-the-middle attacks.
Error handling: Use proper error handling to prevent sensitive data from leaking to the client and to log errors.
Security headers: Add security headers to protect against common web vulnerabilities.
🚧 It's vital to keep in mind that ensuring the security of your NestJS GraphQL APIs is a continuous effort and the methods used may evolve over time. Therefore, it's critical to stay informed of any new advancements and adapt your security strategies accordingly.
We will go step by step:
Enable CORS Inside the
GraphQLModulewe will simply enable cors by using thecorsproperty of itsforRoot()method like the following:// app.module.ts ... GraphQLModule.forRoot({ cors: true // or alternatively parse cors options like: /** cors: { origin: '*', credentials: true, ... }, */ }), ...Encrypt password To keep it simple for now, we will use
bcryptto encrypt and decrypt our passwords.Let’s start by installing the bcrypt utilities:
 # install bcrypt
 $ yarn add bcrypt && yarn add -D @types/bcrypt
Now, let’s inject the
ConfigModuleinto theUserModulethe same way we did for the root directory 🛠️ Update theimportsandprovidersarrays of theuserModulewith the following code:// user.module.ts ... providers: [UserResolver, UserService, ConfigService], imports: [ MongooseModule.forFeature([{ name: User.name, schema: UserSchema }]), ConfigModule.forRoot({ cache: true, }), ], ...Let’s now add the loginUser and improve the createUser method into the
user.services.ts// user.service.ts ... async createUser(createUserInput: CreateUserInput) { // GENERATE HASH PASSWORD TO SAVE const hash = await bcrypt.hash( createUserInput.password, Number(this.configService.get<string>('SALT_ROUND')), ); const createdUser = new this.userModel({ ...createUserInput, password: hash, }); return createdUser.save(); } async loginUser(loginInput: LoginUserInput) { const { email, password } = loginInput; const user = await this.userModel.findOne({ email }); if (!user) { throw new Error('Invalid credentials'); } const isMatch = await bcrypt.compare(password, user.password); if (!isMatch) { throw new Error('Password or email address incorrect'); } return user; } ...Get ready for some exciting news! We're taking our user creation to the next level by implementing password encryption using bcrypt. As we start adding features such as JWT tokens, authorization, and a complete registration flow, we don't want our user.service file to become overwhelming. In a NestJS architecture, service files serve the purpose of interacting with the database, so we'll keep our user.service file as the go-to source for retrieving, verifying, and modifying data in the user collection. Instead of including login logic in the user.service file, we'll create a brand new module dedicated to handling authentication (and possibly authorization) in our application.
That auth module will be responsible for:
Creating a new user, making sure their passwords are encrypted correctly(as above)
Logging in an existing user making sure it sends a valid jwt token
Implementing Guards(sort of middleware) so that we protect some mutations and queries
This topic is a bit confusing and less documented in the nest official doc so, I will walk through the most important aspects of it:
Let’s generate new auth.module.ts, auth.service.ts and auth.resolver.ts files using nest cli
 # generate auth module files
 $ cd src/app && nest g module auth && nest g service auth && nest g resolver auth
Install required dependencies to achieve authentication, nest supports passport, and jwt, so we will use that pair to achieve magic.
 # install dependancies
 $ yarn add @types/passport-local @types/passport-jwt -D
 $ yarn add @nestjs/passport passport passport-local @nestjs/jwt passport-jwt
Those are required dependencies that will help us achieve our end goal.
How do we want our queries and mutations to be proceeded? How do we want to receive auth responses? Well, in real-world scenarios, we expect to receive a token when we log in, using our email address and password(local strategy in good terms), with that said, lets create dto files that prepare us to implement that:
🛠️ You can follow along and add the
app/auth/dto/login-response.tsand theapp/auth/dto/login-user.input.tsfiles that look like: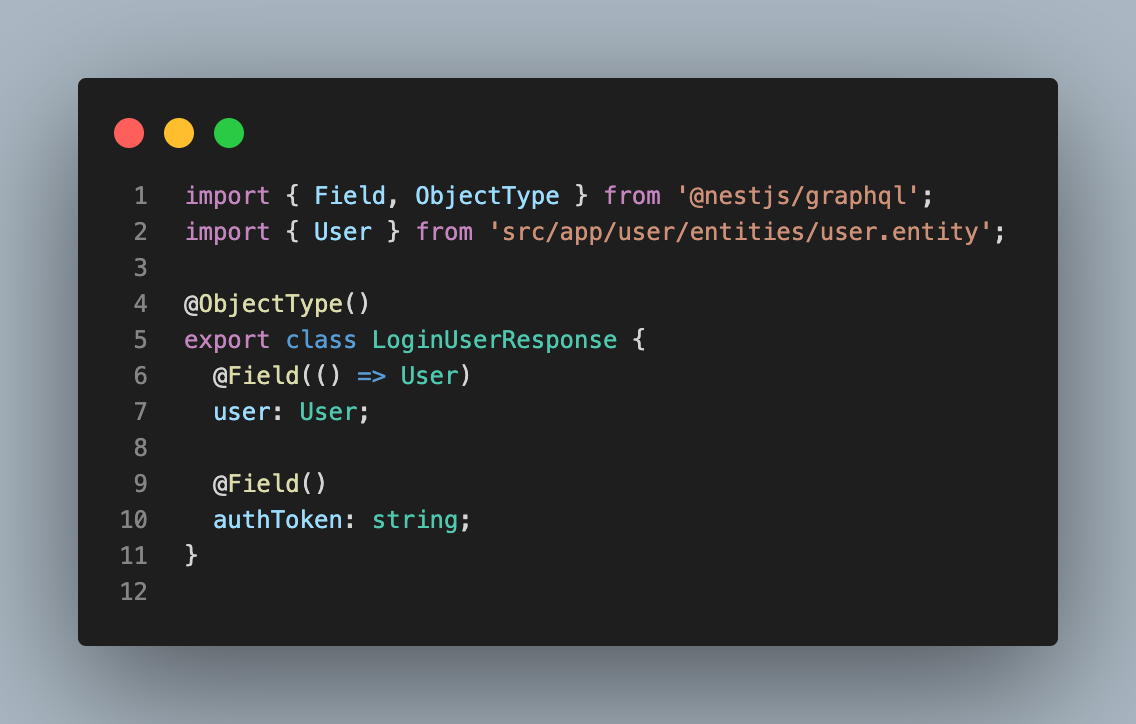
login-response.ts file
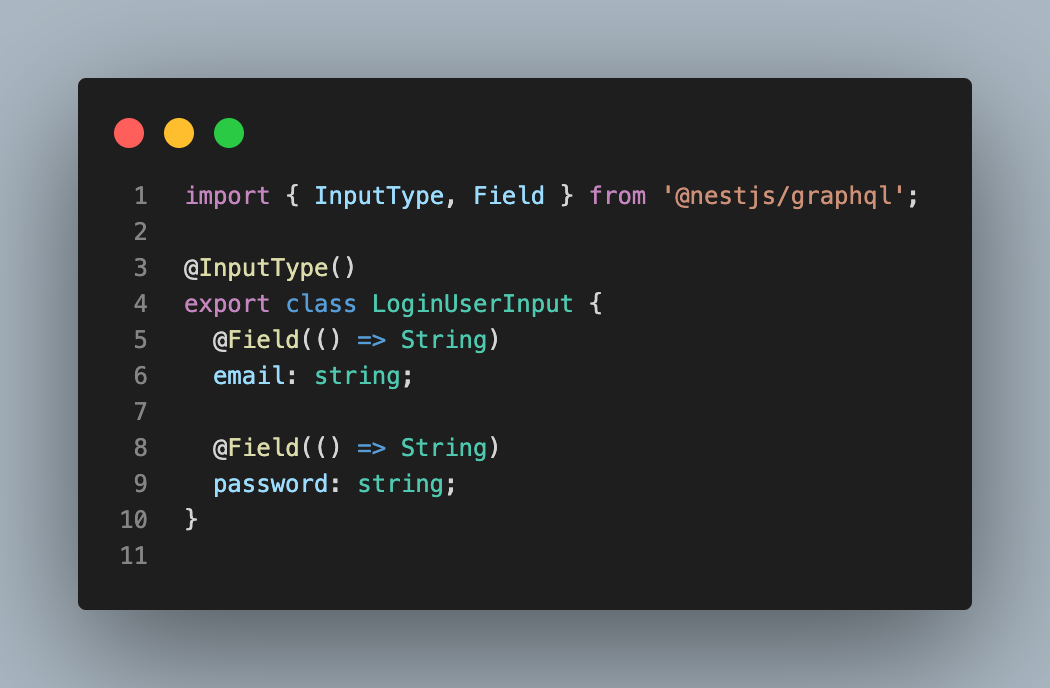
login-user.input.ts image15 - auth/dto files
Nothing strange right? Let’s go ahead with the service and resolvers
In the auth.service.ts file, we need to add a couple of methods that will be the authentication login:
a validateUser method: this method will retrieve data from the database using the findOneByEmail method, will check either the password matches, then will return a user object or null in case the user isn’t valid, here is how it looks like:
  // auth.service.ts file

  ...
  async validateUser(loginUserInput: LoginUserInput) {
      const { email, password } = loginUserInput;
      const user = await this.userService.findOneByEmail(email);

      const isMatch = await bcrypt.compare(password, user?.password);

      if (user && isMatch) {
        return user;
      }

      return null;
    }
  ...
This looks a bit similar to what we’ve done before, nothing really new, however, you may notice that we are using a
UserServiceinstance, to be able to do that, don’t forget to import the user module in the auth module, then user the propertyexportsfrom user module file, to be able to access its service in the outside, by default, they are private in nest.a login method: this method will only take a validated user(by the previous method) and return an instance of
LoginResponseobject, means contains an authToken in it, here is how it shoud look:// auth.service.ts ... login(user: User) { return { user, authToken: this.jwtService.sign( { email: user.email, name: user.name, sub: user._id, }, { secret: this.configService.get<string>('JWT_SECRET'), }, ), }; } ...Few things to mention here that may be interesting. First, we are using another environment variable, that holds the jwt secret word(JWT_SECRET). We installed the
@nestjs/jwtmodule early, that package has a built-in module that we’ll use to be able to use thejwtServiceinstance, just as we did for the config service, as we are getting used to inject modules in our modules, let’s configure theJwtModuleinto ourAuthModuleIn the
auth.module.tsfile, let’s replace the content by the followings:// auth.module.ts // all imports ... @Module({ providers: [ AuthService, AuthResolver, JwtService, ], // We nedd to make sure we've imported the userModule, because we're using it's service imports: [ UserModule, PassportModule, ConfigModule, JwtModule.registerAsync({ inject: [ConfigService], imports: [ConfigModule], useFactory: (configService: ConfigService) => { const properties: JwtModuleOptions = { secret: configService.get<string>('JWT_SECRET'), signOptions: { expiresIn: '24h', }, }; return properties; }, }), ], }) export class AuthModule {}As you can see here, we have used the
registerAsync()method from JwtModule to be able to inject the secret key asynchronously, then returned the config options using theuseFactoryproperty, just like we did for the MongooseModule in the root module. As we are in this file, we also added the PassportModule, as we will need it soon for our strategies. Well done, we can now use the jwt service instance worry freely.a signup method: as you can imagine, this will contain the logic for our signup feature, here is how it looks like:
  // auth.service.ts

  ...
  async signup(payload: CreateUserInput) {
      // CHECK IF THE USER ALREADY EXISTS
      const user = await this.userService.findOneByEmail(payload.email);

      if (user) {
        throw new Error('User already exists, login instead');
      }

      // GENERATE HASH PASSWORD TO SAVE
      const hash = await bcrypt.hash(
        payload.password,
        Number(this.configService.get<string>('SALT_ROUND')),
      );

      return this.userService.createUser({ ...payload, password: hash });
    }
  ...
Same logic here, first we make sure the user doesn’t exist, then we proceed with the creation of the account(interaction with the database), we decide to let this responsability to the user.service logic file.
As you can see here, each method above has a single responsability, we have simple methods easy to understand and that can be scaled at any moment, just like we did, creating a new module. Well done, let’s move in to the guards, and understand why we need them:
Into the
auth.resolver.tsfile, let’s see how we consume those logic// auth.resolver.ts ... @Mutation(() => LoginUserResponse) @UseGuards(GqlAuthGuard) login( @Args('loginUserInput') loginUserInput: LoginUserInput, @Context() context: any, ) { return this.authService.login(context.user); } ...This might be a bit confusing but, let’s break it down in a second.
We are using one of the most important feature of nest in this part,
Guards. Guards are a way to add middleware logic to specific mutations or queries(routes or controllers for Rest APIs) in NestJS, they can be used to perform tasks such as authentication, authorization, or request validation before a request is handled by the corresponding controller.This also means, before running the
auth.service.login()method, our guards will first be executed. We have used@UseGuardsfrom@nest/commonand we have passed in a custom guard calledGqlAuthGuardthat we haven’t implemented yet. How will it work?The guard will receive input that we pass through
loginUserInput, then verify if the user is valid, and at the end, if the user isn’t valid, it will return an exception, if the user is valid, it will put that user in what we callcontextof the request, that context will contain information about the user who is querying the server, and in this particular use case, that user will also be the one who needs to login.Let’s now implement 2 additional files:
  // gql-auth.guards.ts

  import { ExecutionContext, Injectable } from '@nestjs/common';
  import { GqlExecutionContext } from '@nestjs/graphql';
  import { AuthGuard } from '@nestjs/passport';

  @Injectable()
  export class GqlAuthGuard extends AuthGuard('local') {
    constructor() {
      super();
    }

    getRequest(context: ExecutionContext) {
      const ctx = GqlExecutionContext.create(context);
      const req = ctx.getContext();
      req.body = ctx.getArgs().loginUserInput;

      return req;
    }
  }
As this us not a rest api, Nest recommend to build you own guard, that extends the
AuthGuardWe are also returning a request, that has a body property coming from the arguments we have passed@Args('loginUserInput') loginUserInput: LoginUserInputthat’s pretty much great, we next have to implement a localStategy that will treat that context.Here is how our
LocalStategyclass will look like:// auth/local.strategy.ts import { Strategy } from 'passport-local'; import { PassportStrategy } from '@nestjs/passport'; import { Injectable, UnauthorizedException } from '@nestjs/common'; import { AuthService } from './auth.service'; @Injectable() export class LocalStrategy extends PassportStrategy(Strategy) { constructor(private authService: AuthService) { super({ usernameField: 'email', }); } async validate(email: string, password: string) { const user = await this.authService.validateUser({ email, password }); if (!user) { throw new UnauthorizedException(); } return user; } }First, when extending the
PassportStrategyclass, we have added theusernameField: 'email',property, by default, PassportStrategy only accepts username and password as parameters, but in our use case, we don’t have a username, we have an email instead, to make our LocalStrategy accept that, we need to specify that, ourusernameFieldis email instead of the username. Then, every strategy we will implement has to contain avalidate()method, this is what the auth-guard will execute first, missing it in our class will make it fail, make sure we have it. Next, we are just calling thevalidateUsermethod from the authService, as we saw before, it will return a valid user if the credentials were correct, or a null if not, in the second case, we throw a native nest errorUnauthorizedException();telling the user that he’s not authorized to proceed with the request, other wise, we just return the user(or not 🤪) The fact is that, as you can see in our login Mutation, the data we are using for the auth.service is already part of the contextreturn this.authService.login(context.user);so we can or not return a user, since it won’t be used in our use case.Well done, the login is completed.
We have an additional guard implemented in the
jwt-auth.guards.tsfile which I let you guys discover by yourself, checking our#54640Now we can protect some resolvers from being queried by an unauthenticated user, let’s say for example the
createBookmutation, if we add a guard, here is how it looks like:// book.resolver.ts ... // Only connected users with valid jwt tokens must create a book(Authentication) @Mutation(() => Book) @UseGuards(JwtAuthGuard) createBook(@Args('createBookInput') createBookInput: CreateBookInput) { return this.bookService.createBook(createBookInput); } ...This way, if you are not providing a valid token in the headers, you can’t proceed. I have protected the create, update and delete mutations, as you can see in the GitHub repository.
🤩 Great job getting through that! It may have been a bit dense, but it was definitely worth it. Now that you've learned about it, don't be afraid to re-read the section or practice what you've learned on your own. Remember, even though it may be confusing at first, this is an important part of building a NestJS application.
Deploy the codebase
We have covered the most core features of Nest, and we have made a long way to get here, let’s celebrate … Oups, before we celebrate, we need to ship our app to clients, in this last part, we will deploy the app we just built on
To deploy the app, you can use any platform of your choice, you can use Render for this first part, the setup is straightforward, however, make sure in the start command you put yarn start:prod and make sure you have imported all our environment variables, to be injected to our app on build time
Conclusion
In the first part of this series provided an introduction to Nest, a powerful NodeJS framework that allows you to build efficient and scalable applications. By diving into the fundamentals of Nest, we have set up the foundation for our final project, while exploring a couple of key concepts of the framework, a powerful GraphQL API using Nest and MongoDB. With this knowledge, we were able to understand the nest architecture and built on top of built-in packages, hope you enjoyed building along. In the next parts of this series, we will continue to build upon this foundation and learn how to implement best practices and scale our app in a real-world scenario, such as TDD, CI/CD, and microservice architecture.
Have you enjoyed this reading? Let’s connect on Twitter, LinkedIn and Github for more content like this.
Thank you for reading, and sharing this with your network, meet you in the second part.

