Build a GraphQL API with NestJs and MongoDB, in a modern way - Part 2.

I'm a passionate software engineer with extensive experience building enterprise-level applications from scratch using JavaScript technologies. I love writing and sharing knowledge with others, and I believe that the best way to learn is by teaching. When I'm not coding, you can find me buried in a good book or challenging my mind with a game of chess.
Overview
Are you ready to take your GraphQL development skills to the next level? In this series of four articles, I'll guide you through the process of building a powerful GraphQL API using Nest and MongoDB. You'll learn best practices, and see how to scale your app just as you would in a real-world scenario.
First, we'll kick things off by diving into the fundamentals of Nest, a powerful NodeJS framework. We'll set up the foundation for our final project, and by the end, you'll know how to manually deploy your own sample application, if you missed this part, please take a moment to read it here.
Next(current reading), we'll delve into the world of Test Driven Development (TDD) for GraphQL. You'll see the benefits it brings to the development process and learn how to test your current resolvers and implement new ones using this approach.
In the third installment, we'll explore how to apply Continuous Integration and Continuous Deployment (CI/CD) to Nest and GraphQL apps. We'll create our pipelines and, building off the concepts from the second part, you'll see the true power of this approach in action. Once set up, you won't have to worry as much about delivering to the frontend team, and you'll be able to catch errors even before the app is shipped to client apps.
Finally, in the fourth and final installment, we'll take things up a notch by adding features that will introduce you to the world of micro-services. You'll learn how to break down your monolithic app into smaller, independent micro-services without disrupting any existing functionality. This is the modern approach, saving you from the headache of long, drawn-out migrations. So, let's get started and take your GraphQL development skills to the next level!
The full source code can be found here(part-2) branch.
Prerequisites
To fully benefit from this series, it's important you have read the first part of the series, and have a basic knowledge of NodeJS, GraphQL, NestJS, TypeScript, and MongoDB. However, even if you're new to these technologies, don't worry - this series will provide a comprehensive overview of our stack, including the most crucial aspects we'll be using along the way.
What is TDD?
TDD stands for Test-Driven Development. It is a software development approach where tests are written before the implementation of the corresponding code. This means that the developer writes tests that will fail until the implementation is done. The tests serve as a way to specify the requirements of the code and ensure that it works as expected.
In the context of building a GraphQL API using NestJS, TDD can be used to write tests for the resolvers, services, and other components of the application. The tests can be used to check that the resolvers are correctly handling the GraphQL queries and mutations, that the services are interacting with the database correctly, and that the overall application is working as expected.
TDD is a good practice for building software, it can help ensure that the code is working correctly and it makes the development process more efficient and more productive, it also makes it easier to refactor the code and add new features.
The TDD workflow can be resumed as the following diagram:
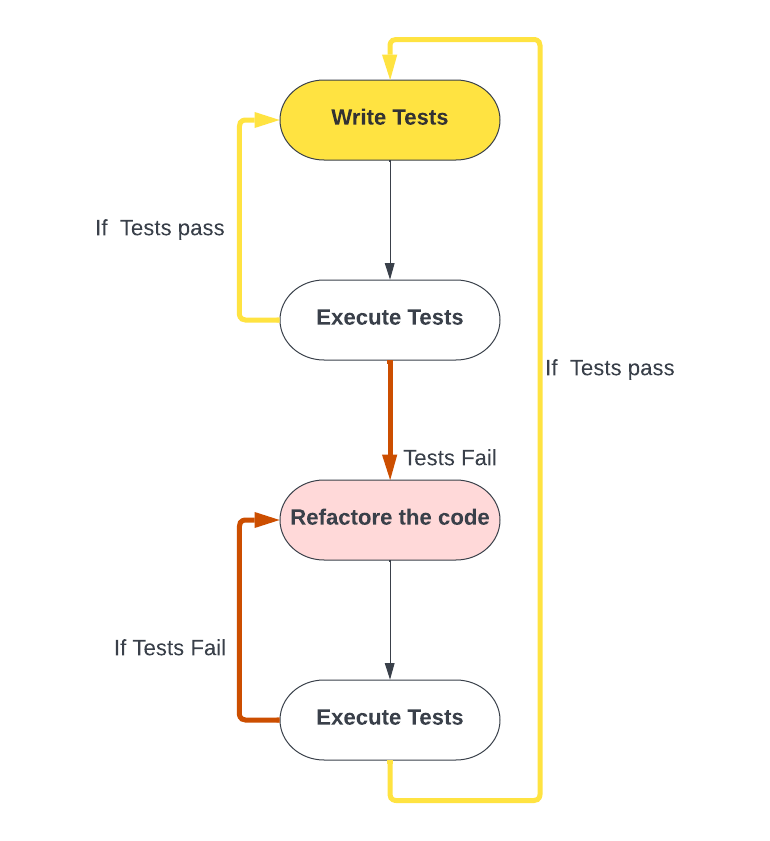
image1 - TDD workflow
From this diagram, we understand that we should adapt our code logic the way they pass the tests we first wrote, and should implement new test cases only when the ones we currently have passed the tests. Let’s see this in practice.
Advantages of TDD
If you ever wonder, before we get started with the actual implementations, here are a few advantages of using the TDD approaches in your next projects:
Improves code quality and maintainability: TDD helps ensure that the code is written in a modular, scalable, and maintainable manner by requiring developers to break down complex functionality into smaller, testable units, this is what we did earlier by splitting the authentication features into small methods in our auth module.
Early detection of bugs and regressions: By writing test cases before writing the actual implementation, TDD allows developers to catch bugs and regressions early in the development cycle, which can save time and resources.
Increases confidence in code changes: TDD provides a safety net for developers, allowing them to make changes to their code with confidence, knowing that their tests will alert them if anything breaks.
Better documentation of code: Writing test cases forces developers to think through how their code should behave and what the expected outputs are, which can serve as documentation for future reference.
Facilitate design and architecture improvement: TDD can help drive the design and architecture of a GraphQL API, as developers write tests to ensure that the API meets the requirements and behaves as expected.
Here are some examples:
Writing a test to ensure that a query returns the expected data, such as checking that a query for all books returns a list of books with the correct titles, authors, and publication dates.
Writing a test to ensure that a mutation updates the data correctly, such as checking that a mutation to add a new book to the database correctly updates the list of books returned by a query.
Writing a test to ensure that a query or mutation fails with the correct error message when invalid data is passed in, such as checking that a query for a book with an invalid ID returns a "Book not found" error, or if a user already exists, by returning an exception, etc.
Let’s see it all in practice by testing all our existing code logic.
Test existing resolvers
Prepare the environment
Even though Nest has made a basic testing setup with jest, we need to make a few improvements to what already exists, our environment doesn’t know anything about our database, or configuration such as helper modules(configModules, or jwtModule).
Let’s go step by step:
Make sure we are at the same starting point, checking out
#c4aa72Taking a look at the
user.service.specs.tsfile, this is what we currently have:// app/user/user.service.spec.ts import { Test, TestingModule } from '@nestjs/testing'; import { UserService } from './user.service'; describe('UserService', () => { let service: UserService; beforeEach(async () => { const module: TestingModule = await Test.createTestingModule({ providers: [UserService], }).compile(); service = module.get<UserService>(UserService); }); it('should be defined', () => { expect(service).toBeDefined(); }); });From what we have, Nest has set up a testing file with only one provider, but having a look at our
user.service.tsfile, we can see that the user service requires more than one dependency which is the UserService, and ConfigService, update theprovidersproperties with:... providers: [UserService, ConfigService], ...We need our tests to be executed as fast as possible, so we can’t use a real database, instead, we will use a mocked database. The mockup setup we've got here from Nest is just a basic one. With it, we won't be able to utilize methods like
save()orexec()unless we set up proper mock functions using Jest(we will explore the jest mocking function later on). Personally, when testing services that use Mongoose, I prefer to simulate the functions without any hassle, which is why I use mongodb-memory-server. Let's go ahead and install it and configure it smoothly on our server.First, let’s install the required packages
  # install packages
  $ yarn add -D mongodb-memory-server
Then let’s create a way for NestJS to use it in our tests. In our common folder, let’s create a folder called
helperswith the file namedmongoose.helper.tswith the following:// app/common/helpers/mongoose.helper.ts import { MongooseModule, MongooseModuleOptions } from '@nestjs/mongoose'; import { MongoMemoryServer } from 'mongodb-memory-server'; let mongo: MongoMemoryServer; export const rootMongooseTestModule = (options: MongooseModuleOptions = {}) => MongooseModule.forRootAsync({ useFactory: async () => { mongo = await MongoMemoryServer.create(); const mongoUri = mongod.getUri(); return { uri: mongoUri, ...options, }; }, }); export const closeInMongodConnection = async () => { if (mongo) await mongo.stop(); };With this setup, we’ll be able to use native mongoose methods, without any need to over-mocking them.
Now, let’s update the way we set up the TestingModule, in our
user.service.spec.tsfile:... imports: [ rootMongooseTestModule(), ConfigModule.forRoot(), MongooseModule.forFeature([ { name: User.name, schema: UserSchema, }, ]), ], ...The
rootMongooseModuleis imported from the helper we just created.Now, what do we really need? We need 2 different things when we are using this mocked database:
Before all test cases execution, we need to connect to it
After all test cases execution, we close the connection
This will ensure that even if we have multiple files using the mocked database, none of them will interfere with the correct fullness of another, this is the purpose of unit testing.
With that being said, we need to change the beforeEach to beforeAll, and add an afterAll hook to our testing files, you can read about jest hooks here for more details.
After this update, this is how our file will look like:
        // app/user/user.service.spec.ts

        ...
            let service: UserService;
          let module: TestingModule;

          beforeAll(async () => {
            module = await Test.createTestingModule({
              imports: [
                rootMongooseTestModule(),
                ConfigModule.forRoot(),
                MongooseModule.forFeature([
                  {
                    name: User.name,
                    schema: UserSchema,
                  },
                ]),
              ],
              providers: [UserService, ConfigService],
            }).compile();

            service = module.get<UserService>(UserService);
          });

          afterAll(async () => {
            if (module) {
              await module.close();
              await closeInMongodConnection();
            }
          });
        ...
You can see that we have made small changes in the way we set up TestingModule for the user module, now let’s try to run tests on this file again, and see what we get.
Running yarn test src/app/user/user.service.ts from the root of the project, you may notice this error:
        $ jest src/app/user/user.service.spec.ts
         FAIL  src/app/user/user.service.spec.ts
          ● Test suite failed to run

            Cannot find module 'src/app/book/entities/book.entity' from 'app/user/entities/user.entity.ts'

            Require stack:
              app/user/entities/user.entity.ts
              app/user/user.service.spec.ts

              2 | import { Document, Schema as MongooSchema } from 'mongoose';
              3 | import { Prop, Schema, SchemaFactory } from '@nestjs/mongoose';
            > 4 | import { Book } from 'src/app/book/entities/book.entity';
                | ^
              5 |
              6 | @ObjectType()
              7 | @Schema()

              at Resolver._throwModNotFoundError (../node_modules/jest-resolve/build/resolver.js:425:11)
              at Object.<anonymous> (app/user/entities/user.entity.ts:4:1)
              at Object.<anonymous> (app/user/user.service.spec.ts:1:1)

        Test Suites: 1 failed, 1 total
        Tests:       0 total
        Snapshots:   0 total
        Time:        5.206 s, estimated 8 s
        Ran all test suites matching /src\\/app\\/user\\/user.service.spec.ts/i.
Which is weird, since our imports are correct right? If you are not running into this error, don’t take any further action, you are good to go, but for anyone running into this, we will need to specify to jest what is the root directory of our project, or simply change the way we import modules in our project from src/something/... to ../../something/... we can fix it by changing everywhere we have imported files using absolute path, another way is making changes under jest property in the package.json file:
        "jest": {
            "moduleFileExtensions": [
              "js",
              "json",
              "ts"
            ],
            "rootDir": "src",
            "testRegex": ".*\\\\.spec\\\\.ts$",
            "transform": {
              "^.+\\\\.(t|j)s$": "ts-jest"
            },
            "moduleNameMapper": {
              "^src/(.*)$": "<rootDir>/$1"
            },
            "collectCoverageFrom": [
              "**/*.(t|j)s",
              "!main.(t|j)s",
              "!**/*.module.(t|j)s",
              "!**/*.input.(t|j)s",
              "!**/*.entity.(t|j)s",
              "!**/*.guards.(t|j)s",
              "!**/*.response.(t|j)s",
              "!**/*.strategy.(t|j)s",
              "!**/*.args.(t|j)s",
              "!**/*.helper.(t|j)s",
              "!**/*.types.(t|j)s",
              "!**/*.helpers.(t|j)s",
              "!**/node_modules/**"
            ],
            "coverageDirectory": "../coverage",
            "coverageThreshold": {
              "global": {
                "branches": 75,
                "functions": 50,
                "lines": 75,
                "statements": 75
              }
            },
            "testEnvironment": "node"
          }
With the moduleWrapper property, we are telling Jest how to resolve module paths, now modules that start with src/ will be looked into <rootDir>/, which is the src folder by default (this is configured a few lines above).
in the collectCoverageFrom property, we are specifying which files will be considered when we will track the coverage of our codes, we are telling jest to avoid all the entities. guards, strategies, types, helpers, and args files when tracking the coverage. Then in the coverageThreshold property, we are defining our targets, thus, we are targeting 75% of branches covered(any time you create an if/else statement or switch/case you create a branch in the jest context), 50% of functions, 75% of lines, and 75% of statements, this will serve as metrics to judge how well-covered or code base is covered.
With this setup, we are good to go for implementing our unit tests and testing again the user.service file and make sure it doesn’t show any errors.
Kudos, we have set up our testing for the service file, now you can update the book, author, and auth service files the same way, for the auth service, don’t forget to add the mock of the user entity as we will be interacting with the user collection to test the authentication feature.
You can check out
#16826to have the required setup before we follow.
Let’s properly test our service …
Test your service files
I will use
Chanceutility functions to create mocking values, feel free to use any tool of your choice.Let’s prepare for data to use while testing, by adding the code below on top of the user.service.spec file, after installing the “chance” package.
 // app/user/user.service.spec.ts

 // imports
 import * as Chance from 'chance'
 ...
 const UPDATED_ADDRESS_LENGTH = 15;
 const ADDRESS_LENGTH = 20;

 const chance = new Chance();
 let userId = '';

 const createUserInput: CreateUserInput = {
   name: chance.name(),
   password: 'FakePassword1?',
   address: chance.string({ length: ADDRESS_LENGTH }),
   email: chance.email(),
 };

 const updateUserInput: UpdateUserInput = {
   _id: new MongooSchema.Types.ObjectId(''),
   name: chance.name(),
   address: chance.string({ length: UPDATED_ADDRESS_LENGTH }),
 };
 ...
 // testing scopes
We have created the
createUserInputand theupdateUserInputdtos, which will help us test our mocking database.Now, let’s test the most simple one, the create user method in the user.service file, here is how we can test it:
 // test case one: create a user

 ...
 it('should create a user with createUserInput', async () => {
     const user = await service.createUser(createUserInput);
     expect(user.id).toBeDefined();
     expect(user.name).toBe(createUserInput.name);
     expect(user.address).toBe(createUserInput.address);
     expect(user.email).toBe(createUserInput.email);
     expect(user.password).not.toBeNull();
     updateUserInput._id = user._id;
     userId = user.id;
  });
 ...
Here we are simulating the creation of the user, then we start asserting what we should get, we expect that the user’s name should be the same as the one we have in the
createUserInputafter creation for example. In this use case, we can test as many assertions as possible, but to be able to get the advantage of this process, we will test only the cases that give us confidence in our code.You can write and watch your changes with
$ yarn test:watchNext, in our user.service file, we would like to test the ability to update a user using theupdateUserInputdto, get the list of users paginated, get a user by his email, and remove the user, here is how our user.service.spec file may look like, after testing all these cases: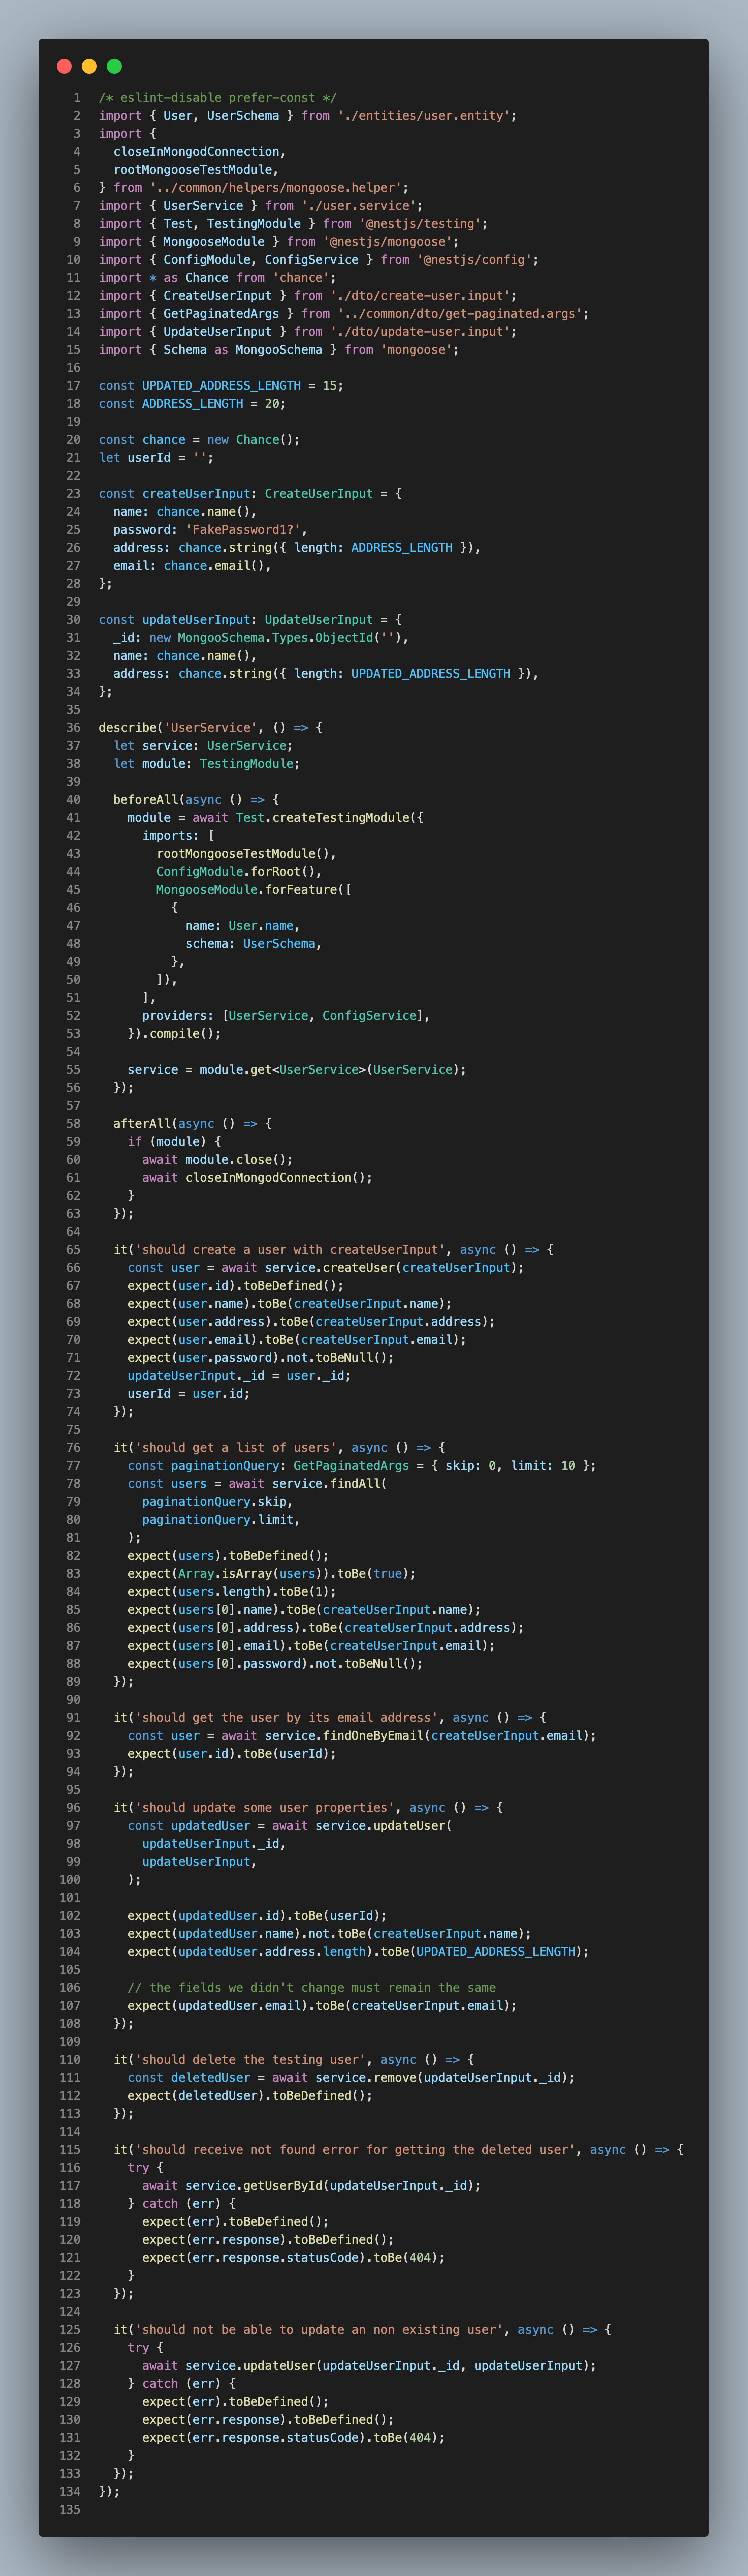
image2 - user.service.spec.ts file
🛠️ Try to replicate it on your end as above. We have tested all the methods in the user.service, let’s run the test on the user.service.spec.ts file again and see what we get:

image3 - unit tests on the user.service.ts file
Now let’s see how covered our code is:
 # run this in the terminal
 $ yarn test:cov
Here is what we get:
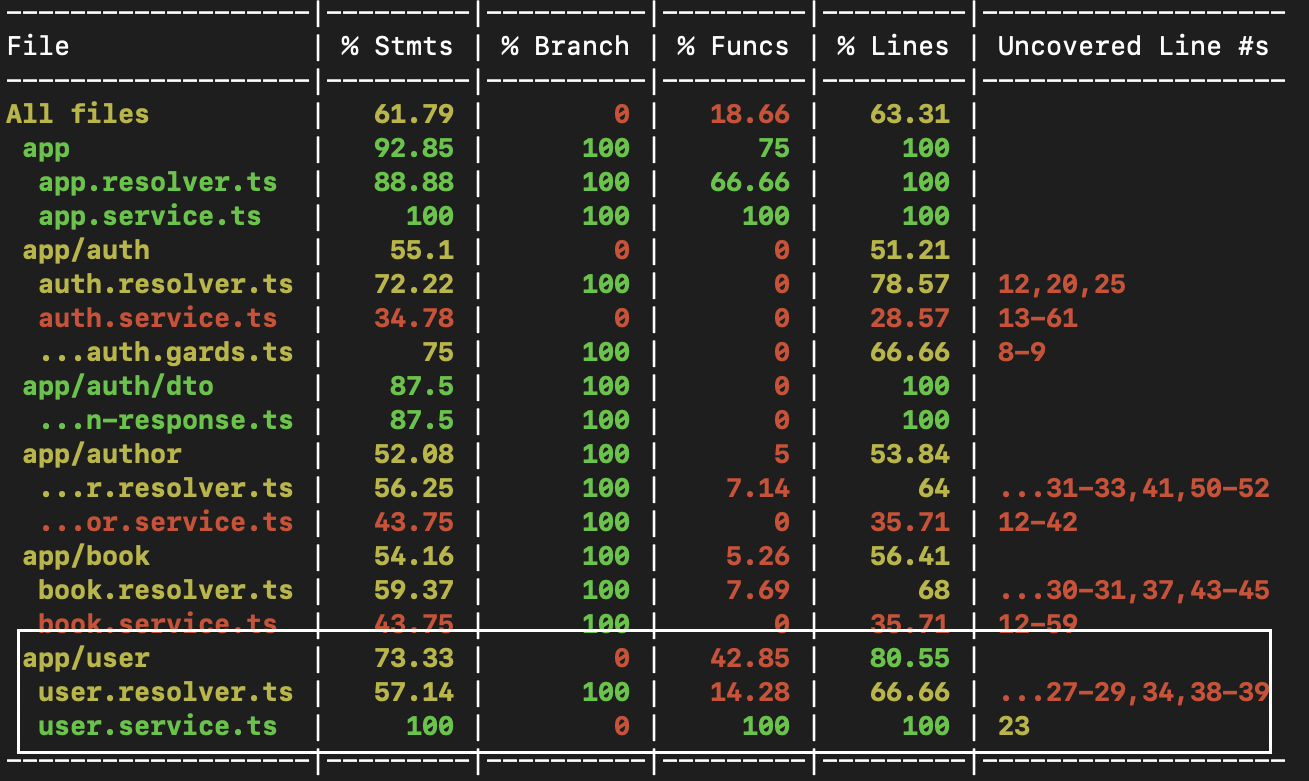
image4 - coverage of the user.service file
As you can see, we have just tested the user.service.ts file, and it’s getting better in terms of coverage.
We will do the same for the other service files, as we did for the user.
🛠️ Code along and try to add much more test cases, if you feel I forgot some
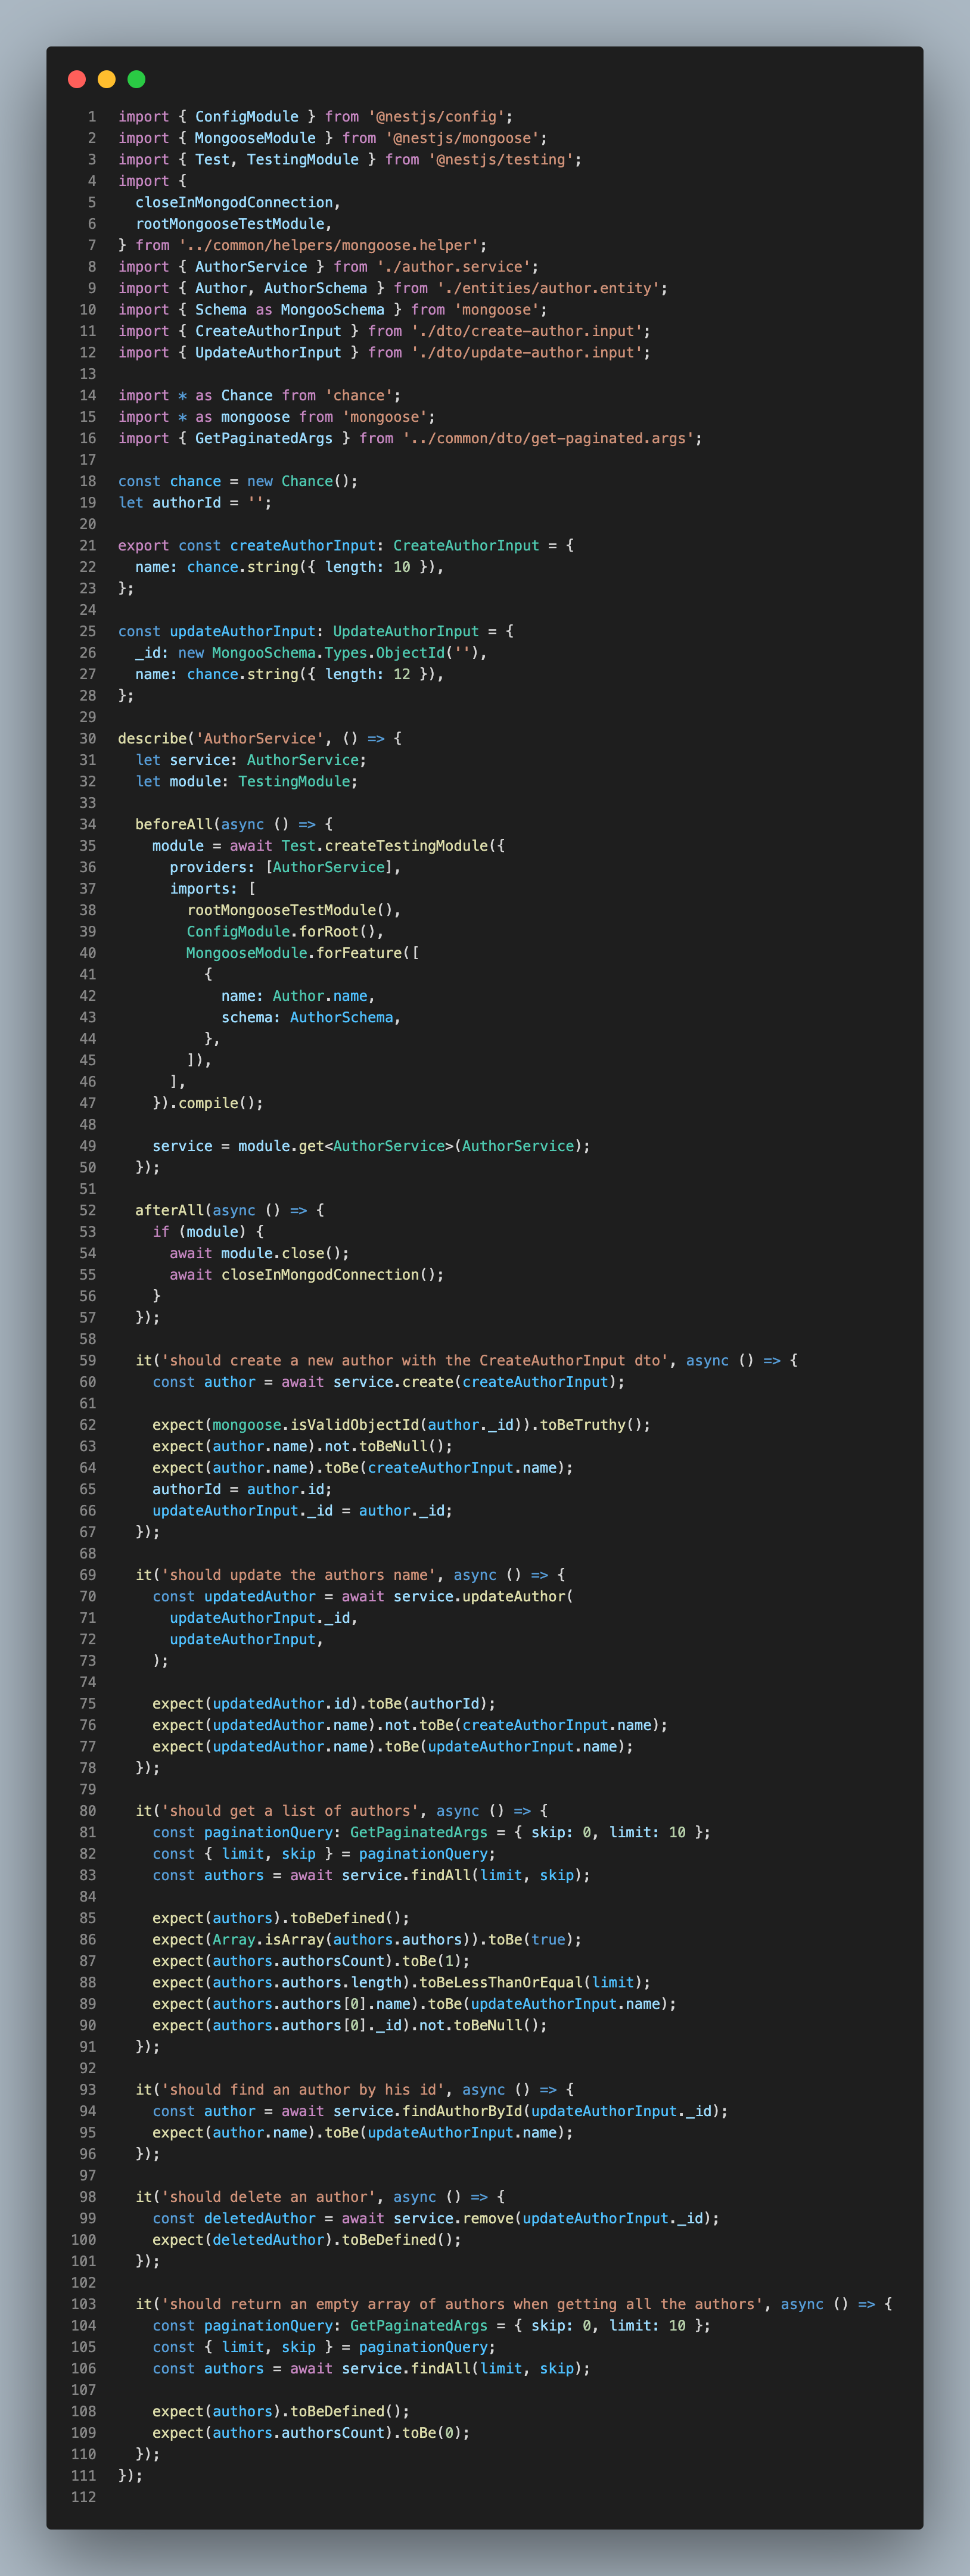
image5A - author.service.spec.ts
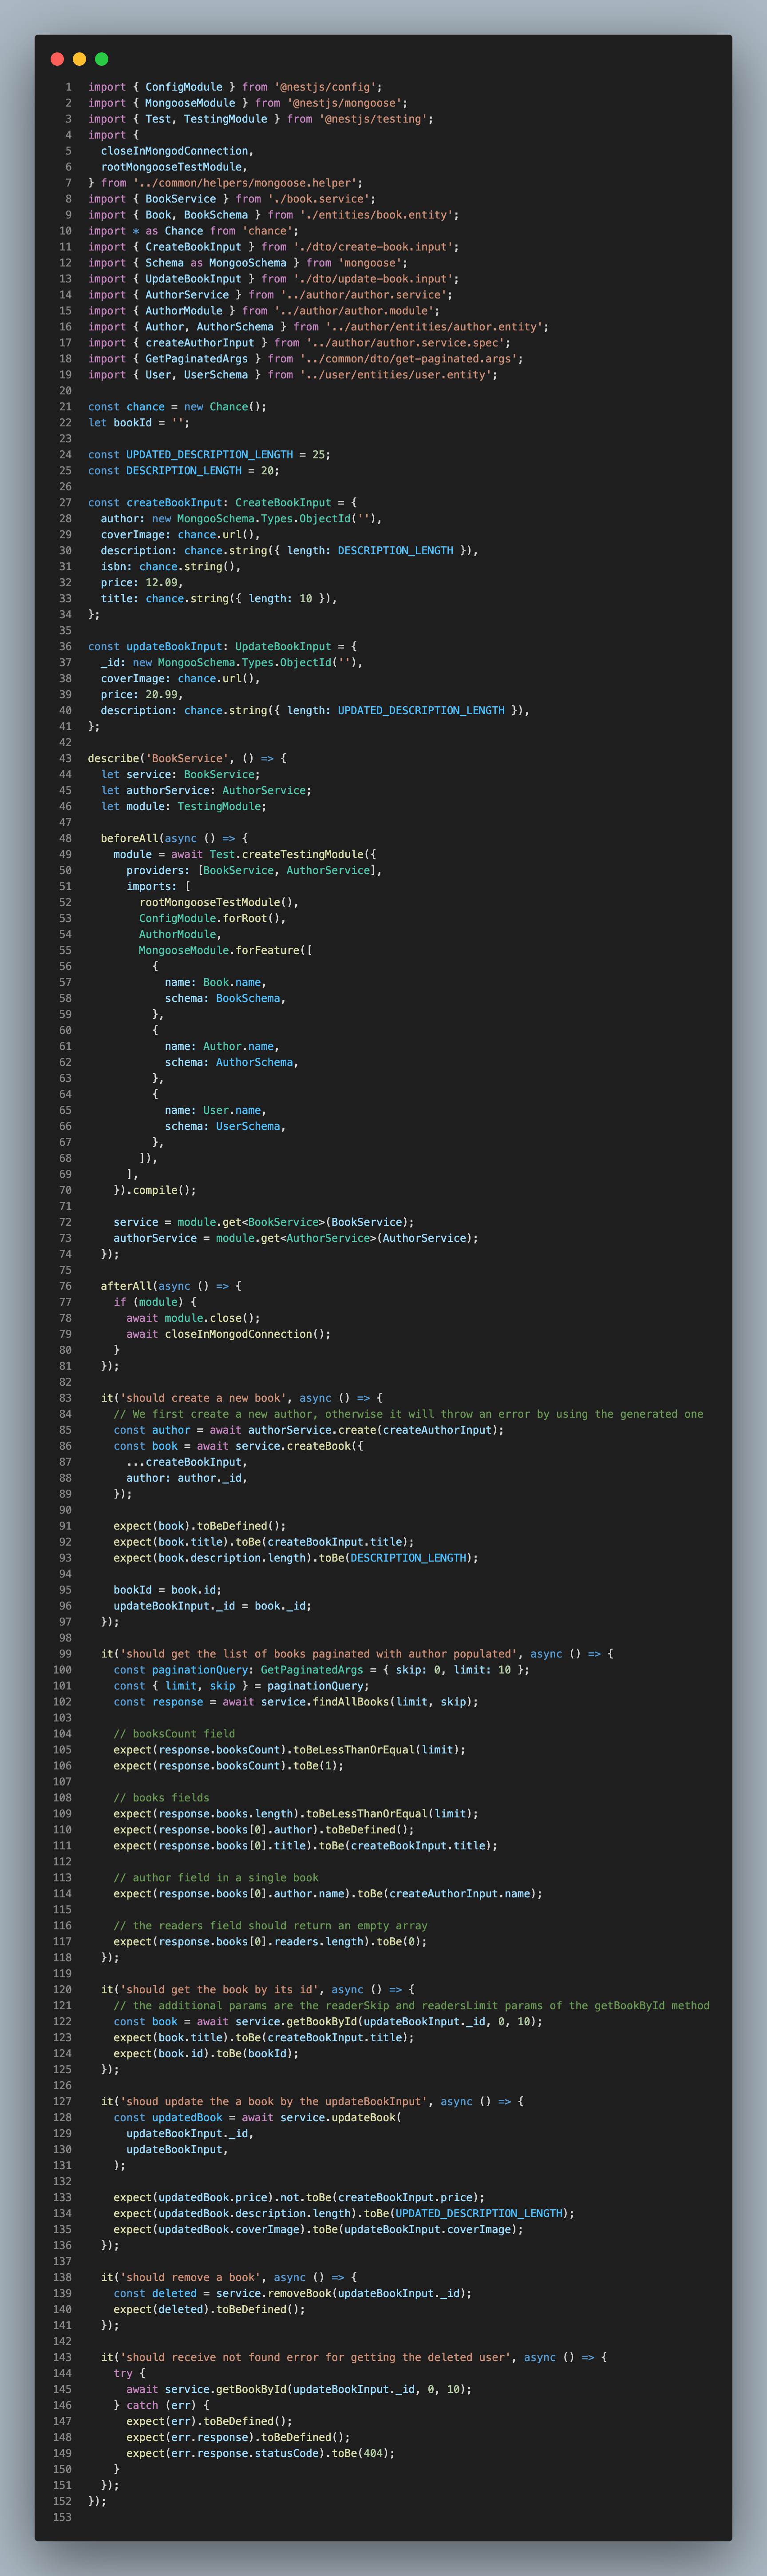
image5B - book.service.ts file
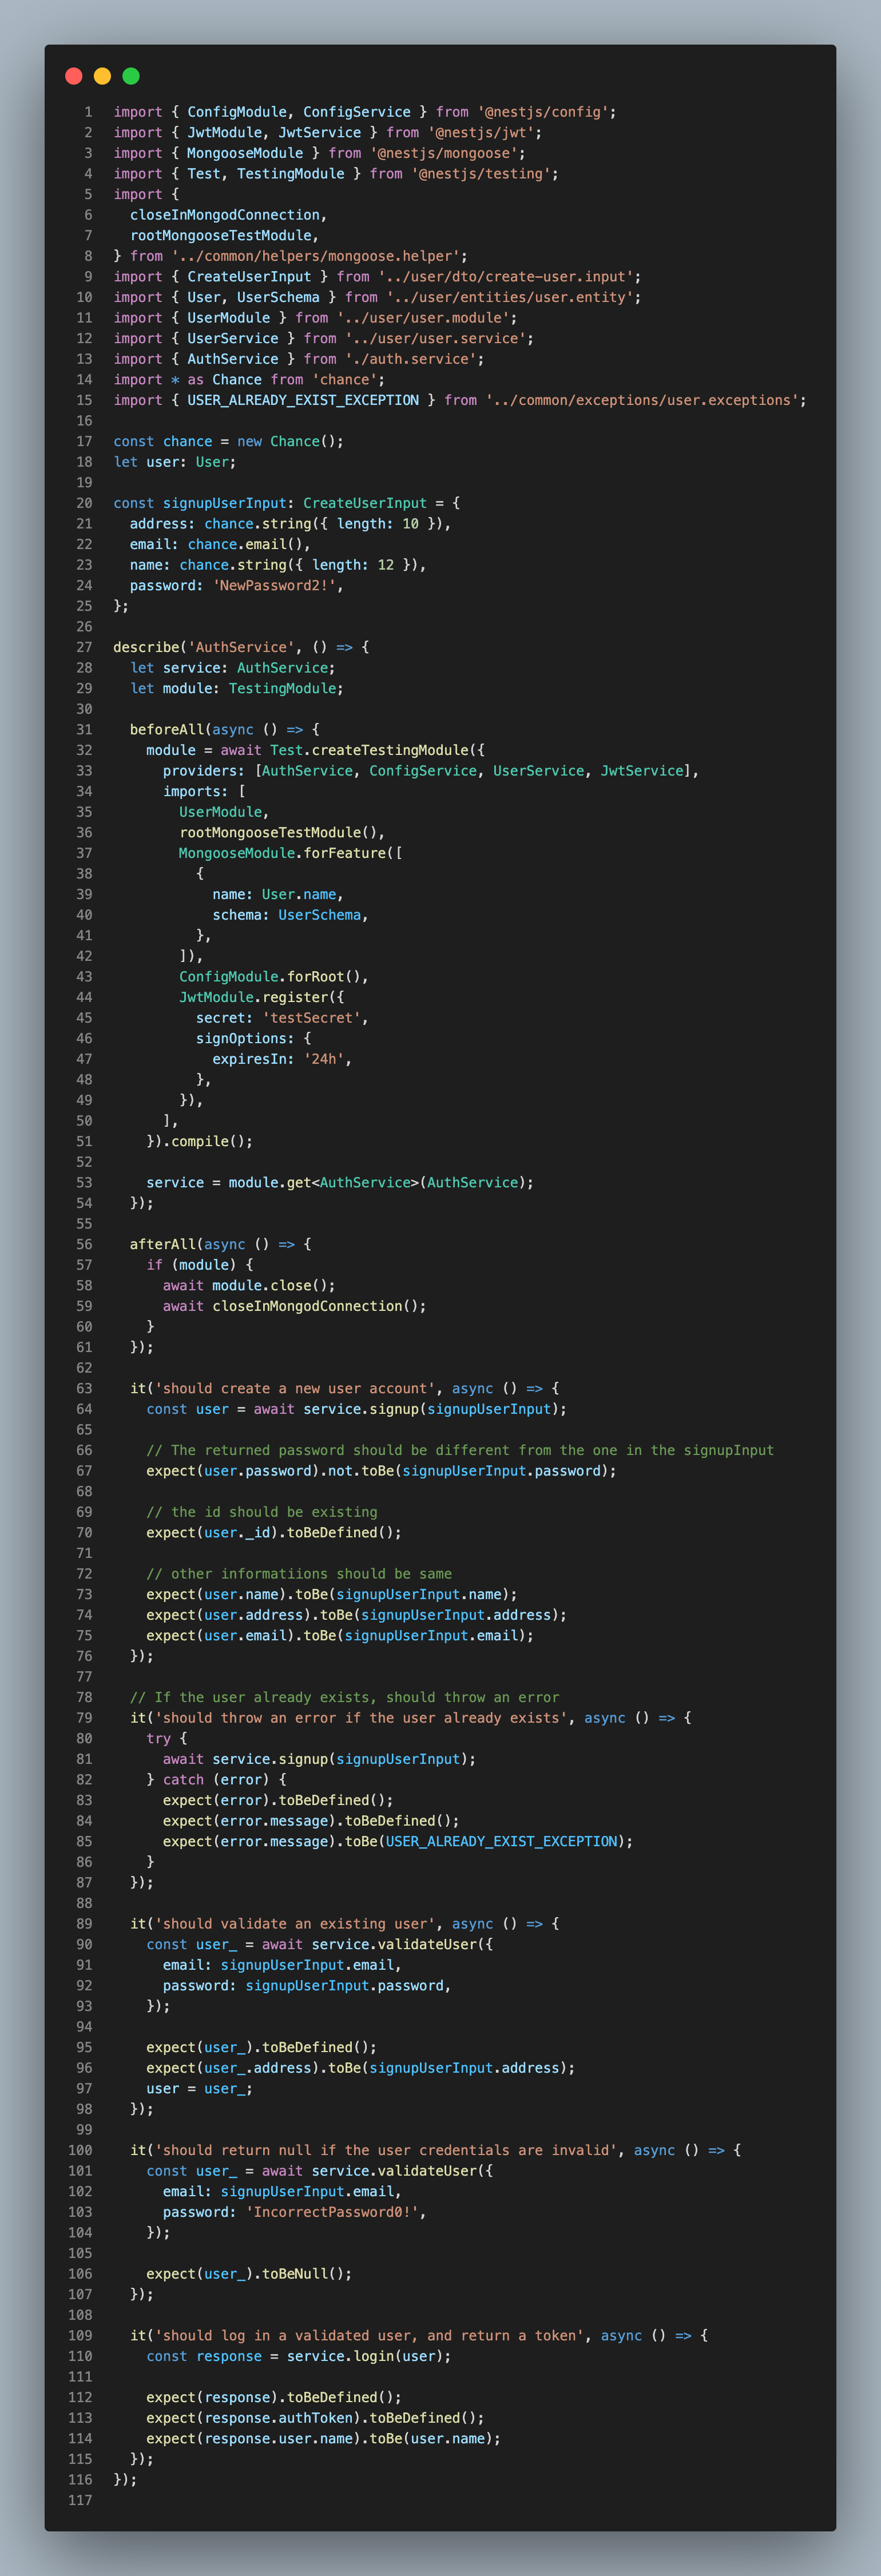
image5C - auth.service.ts file
Here are some we have tested our service files, however, a few aspects need to be clarified:
In the book.service.spec.ts file, we didn’t only use the book model, but also the author and user models, and when we set up the MongooseModule, here is what we did:
  // book.service.spec.ts

  ...
  MongooseModule.forFeature([
    {
       name: Book.name,
       schema: BookSchema,
    },
    {
       name: Author.name,
       schema: AuthorSchema,
    },
    {
       name: User.name,
       schema: UserSchema,
    },
  ]),
  ...
Remember that when we create a book, we need to specify the author’s id, also, when we get a book, we populate the
readersand theauthorfields, using a generated ObjectId couldn’t work because in the context of our mocked database, that generated objectId wouldn’t have all the required properties a reader or an author have, so before testing a book creation, notice that we first created an author(line 85) before the book, this places us in a real-world scenario where it’s impossible to have a book without an author :) like we couldn’t have Bitcoin without Satoshi Nakamoto 😜.🛠️ Take some moment to write these tests on your own before comparing them to the version at
#354c1In the auth.service.spec.ts file, we have also injected the
JwtModuleand its service file, in addition to the UserModule and the ConfigModule, the reason, as you may guess is because the logic that generates token his held by in the JwtService.
Well done, now check the coverage again and notice that we have made huge progress.
In the next section, let’s test our resolvers. By testing service files first, we have used the “Bottom Up” principle, knowing that our resolvers only use methods from the service file, testing resolvers will be much simpler.
Test your resolvers
To test resolver logic, assuming that our services are already tested, we won’t test them again, instead, we will mock them using a mocking function from jest. The idea behind is to simulate what should a well-written method from the service file should return. For example, in the user.service file, our createUser should return this a user object, which is the
createUserInputwhere we added an_idproperty. Confusing? Let me get you covered, see what we have as a mocking function for the createUser method fromuser.service.ts:// user.resolver.spec.ts const createUserInput: CreateUserInput = { name: chance.name(), password: 'FakePassword1?', address: chance.string({ length: ADDRESS_LENGTH }), email: chance.email(), }; ... useValue: { createUser: jest.fn(() => { return { _id: userId, ...createUserInput, }; }), ... // other mocking functions ...As you can see here, we are telling jest to mock for us a provider method called
createUserthat will be consumed by our resolver, makes more sense right?Now, let’s test the createUser method from our resolver:
The way we will test our resolver methods will be much similar to how we tested their corresponding service files, here is, for example, the tests for the
createUserunder our resolver:// app/user/user.resolver.ts ... it('should be able to create a user', async () => { const user = await resolver.createUser(createUserInput); expect(user._id).toBeDefined(); expect(user._id).toBe(userId); expect(user.name).toBe(createUserInput.name); expect(user.email).toBe(createUserInput.email); expect(user.address).toBe(createUserInput.address); userId = user._id; updateUserInput._id = user._id; }); ...As you can see, it is very similar to what we did, of cause we are just making sure that from the input we give(which will come from args), we can get data that our mocking functions return, for this test case, the mocking function returns
{ _id: userId, ...createUserInputWell, for the rest of methods, here is how we can implement the testing:
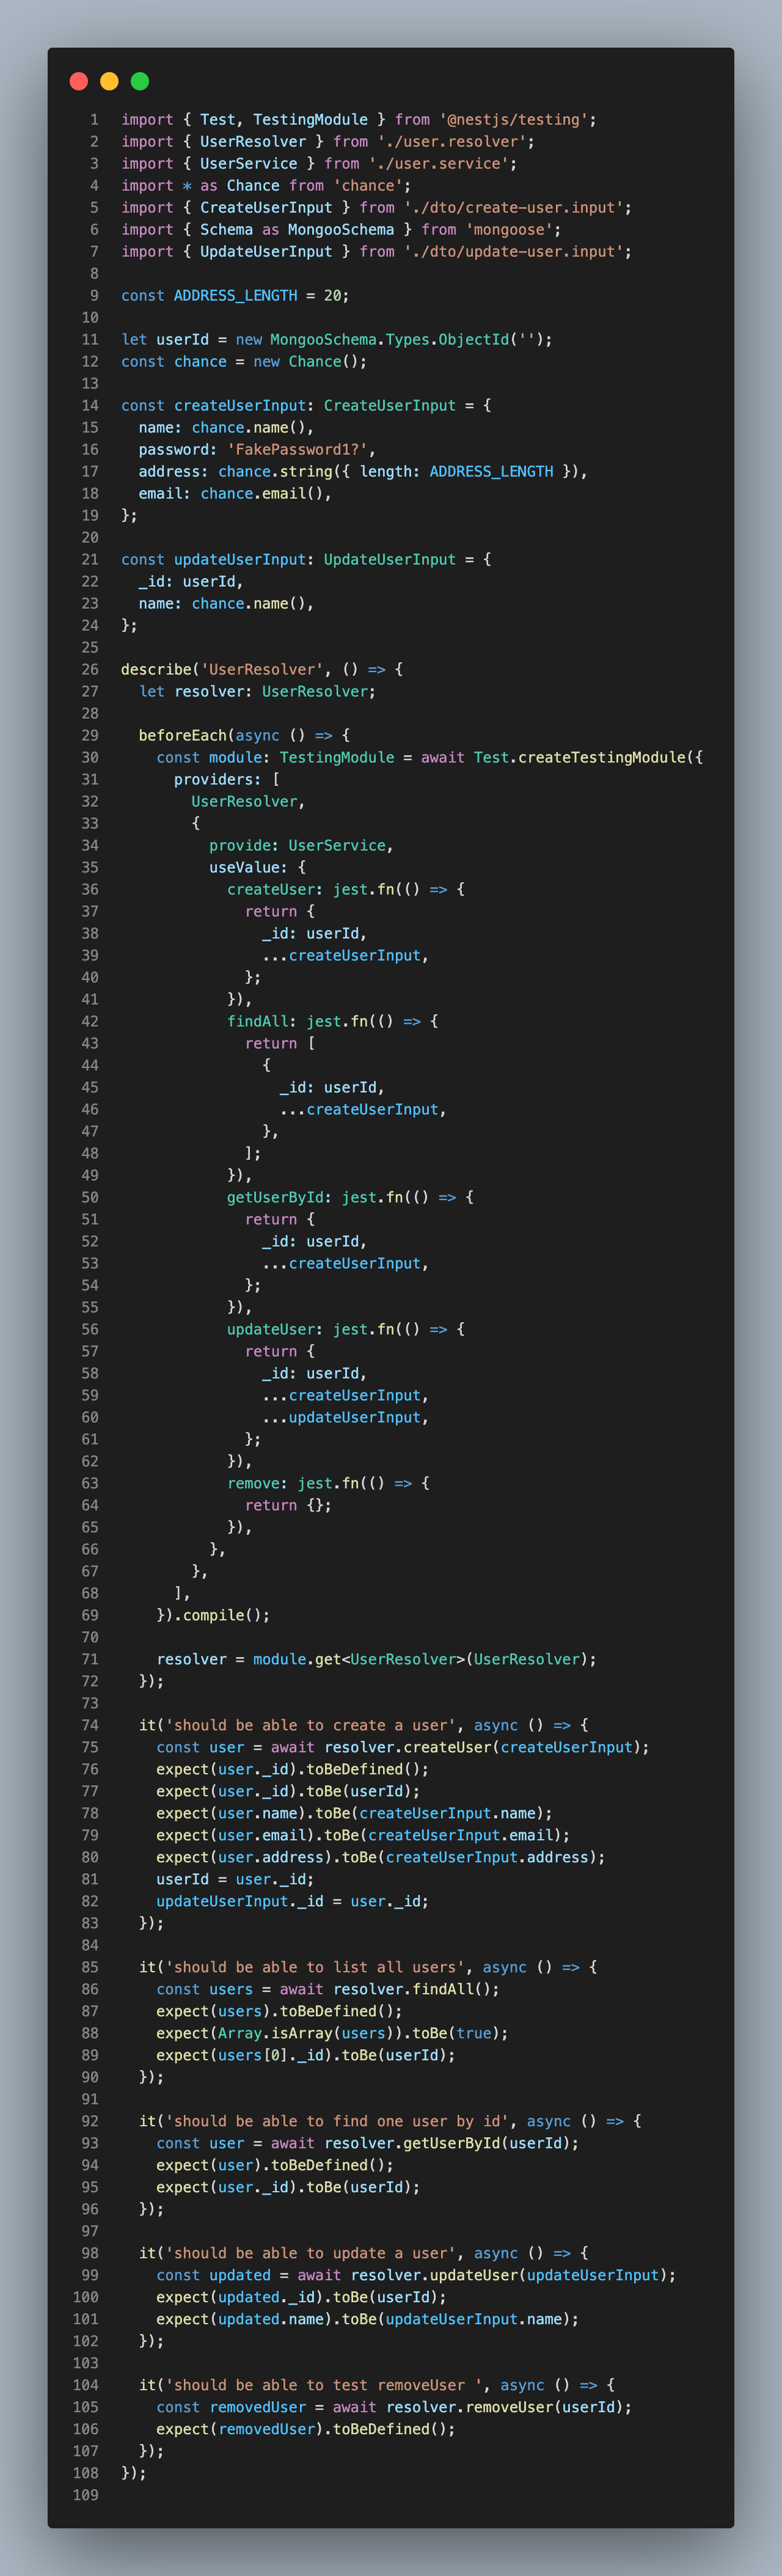
image6 - user.resolver.spec.ts file
As you can see above, we first mocked the functions that are supposed to come from our service file, then we tested the resolver methods, just the same way we tested the service ones, that’s the benefit of the “Bottom Up” approach we described above.
🛠️ Take some time to test the book, author, and auth resolvers and double-check checking out
#258afEnd-To-End testings
Until now, we have only tested blocks of codes separately, and we haven’t tested the nest decorators such as
@Queryor@Mutation. In this section, I get you covered, before we move into the TDD workflow.Let’s see how we can test the
GetHelloquery as the simplest one:By default, nest installs
supertestpackage for us, this package will help us simulate HTTP requests.As you now know, all the graphql requests(mutations and queries) are just POST requests to the entry point of the app which is
/graphqlFrom a client app(as our e2e test will simulate clients’ requests), let’s see what we send:

image7 - graphql requests
As you can see here, our graphql query is sent as a string in the query of the http request, and we are sending variables using the “variables” property. To simulate this, let’s create helper files that will hold these parameters for us:
Under
src/app/common/helpers/graphql.helper.tsadd this content:export const GRAPHQL_ENDPOINT = '/graphql'; export const HELL0_WORLD = 'Hello World!'; export const GET_HELLO_OPERATION_NAME = 'Query'; export const GET_HELLO = `query Query { getHello }`;As you can see above, the GET_HELLO string will contain the graphql operation as a string, just like what we have in our Apollo playground.
Update the
app.e2e.spec.tsfile with the following code:// test/app.e2e.spec.ts import { Test, TestingModule } from '@nestjs/testing'; import { INestApplication } from '@nestjs/common'; import * as request from 'supertest'; import { AppModule } from '../src/app/app.module'; import { GET_HELLO, GET_HELLO_OPERATION_NAME, GRAPHQL_ENDPOINT, HELL0_WORLD, } from '../src/app/common/helpers/graphql.helper'; jest.setTimeout(70000); describe('AppResolver (e2e)', () => { let app: INestApplication; beforeEach(async () => { const moduleFixture: TestingModule = await Test.createTestingModule({ imports: [AppModule], }).compile(); app = moduleFixture.createNestApplication(); await app.init(); }); afterEach(async () => { await app.close(); }); it('should get a hello world', () => { return request(app.getHttpServer()) .post(GRAPHQL_ENDPOINT) .send({ operationName: GET_HELLO_OPERATION_NAME, query: GET_HELLO, }) .expect(200) .expect((res) => { expect(res.body.data.getHello).toBe(HELL0_WORLD); }); }); });We have set up a timeout to 70000ms, sometimes you can experience timeout especially because we have made integration tests, which can be an addition of more than one method executed together.
We have used
requestmethods from supertest to simulate HTTP requests, don’t hesitate to read more about supertest, a very popular and powerful tool for testing HTTP assertion on nodejs servers, with supertest, you can simulate a post, get, put, patch request. Here we will only use post(to simulate a post request) with its callbacks likesend()expect()etc.Now let’s see how we can test a user creation
First, let’s add helpers with operation names, variables, mutations, etc Under
app/common/helpers/create-user.helper.tsfile, just paste this:// app/common/helpers/create-user.helper.ts import * as Chance from 'chance'; const chance = new Chance(); export const CREATE_USER_OPERATION_NAME = 'CreateUser'; const UPDATED_ADDRESS_LENGTH = 15; const ADDRESS_LENGTH = 20; export const CREATE_USER_MUTATION = `mutation CreateUser($createUserInput: CreateUserInput!) { createUser(createUserInput: $createUserInput) { _id address email name password } }`; export const generateCreateUserVariables = () => { return { createUserInput: { name: chance.name(), password: 'FakePassword1?', address: chance.string({ length: ADDRESS_LENGTH }), email: chance.email(), }, }; };As you can see here, we have created all the pieces that are required to send requests such as variables, graphql operations, etc.
The
CREATE_USER_MUTATIONis written just like a client app would query our API in the future, specifying what we need to have in the response.Now, let’s create a file for testing the user resolvers end to end, under
testfolder, let’s add theuser.e2e.spec.tsfile, and past there this:import { Test, TestingModule } from '@nestjs/testing'; import { INestApplication } from '@nestjs/common'; import * as request from 'supertest'; import { AppModule } from '../src/app/app.module'; import { GRAPHQL_ENDPOINT } from '../src/app/common/helpers/graphql.helper'; import { CREATE_USER_MUTATION, CREATE_USER_OPERATION_NAME, generateCreateUserVariables, } from '../src/app/common/helpers/create-user.helper'; import { User } from '../src/app/user/entities/user.entity'; jest.setTimeout(70000); describe('User resolver (e2e)', () => { let app: INestApplication; let user: User; beforeEach(async () => { const moduleFixture: TestingModule = await Test.createTestingModule({ imports: [AppModule], }).compile(); app = moduleFixture.createNestApplication(); await app.init(); }); afterEach(async () => { await app.close(); }); it('Should create an user with user mutation', () => { const createUserInput = generateCreateUserVariables().createUserInput; return request(app.getHttpServer()) .post(GRAPHQL_ENDPOINT) .send({ operationName: CREATE_USER_OPERATION_NAME, query: CREATE_USER_MUTATION, variables: { createUserInput }, }) .expect(200) .expect((res) => { expect(res.body.data.createUser).toBeDefined(); user = res.body.data.createUser; expect(user._id).toBeDefined(); expect(user.name).toBe(createUserInput.name); expect(user.email).toBe(createUserInput.email); expect(user.address).toBe(createUserInput.address); }); }); });Looks similar to what we had before right?
We are expecting to receive a 200 status, and the response we get will have a
body.dataobject with the payload of the response.Now, let’s run our e2e tests:
 # run end-to-end tests
 $ yarn test:e2e
If you were following, you will be able to get something similar to:

image8 - e2e tests
🛠️ Now try to replicate the same process by creating e2e tests for the updateUser, removeUser, and getUser features. You can see results checking out #eef3fd to compare with your implementation
Buckle up! We've just nailed the unit testing of our services and resolvers and even added some slick end-to-end tests. Time to witness the magic of TDD in action. Are you ready for liftoff?
From the existing workflow to TDD
Now that we have our API covered at more than 75%, let’s see how we can add a new feature using the TDD approach.
We will add a buyBook feature, so that, a user can purchase a book, and be among readers for the specific book.
What if a user tries to purchase a book that he already has? Let’s cover all these user cases first in our tests, before implementing the logic.
This is the workflow we’ll use to implement this new feature, using the “Bottom Up” approach:
We first write the unit test in the
book.service.spec.tsfileThen we validate those tests by refactoring our
book.service.tsfileThen, once our service methods are covered, we write tests for the resolvers
And at the end, we refactor our resolvers to validate the tests.
Let’s get started:
In the book.service.spec.ts file, let’s add assumptions for this feature:
A user should be able to buy a new book
A user shouldn’t be allowed to buy more than one copy of the same book
A user can buy more than one different books
In terms of code, here is how we can write them:
// app/book/book.service.spec.ts

...
// inside the main describe scope, I have added this scope

  describe('User purchase features', () => {
    let user: User;
    beforeAll(async () => {
      // First we create a user who will purchase the book
      user = await userService.createUser(createUserInput);
    });

    it('should allow a user to buy one specific book, and be among readers for the book', async () => {
      const updatedBook: Book = await service.buyBook({
        bookId: updateBookInput._id,
        userId: user._id,
      });

      expect(updatedBook.readers.length).toBe(1);
      expect(updatedBook.readers[0].name).toBe(user.name);
    });

    it('should not allow a user to buy more than one copy of the same book', async () => {
      try {
        await await service.buyBook({
          bookId: updateBookInput._id,
          userId: user._id,
        });
      } catch (error) {
        expect(error).toBeDefined();
        expect(error.message).toBeDefined();
        expect(error.message).toBe(
          CANNOT_PURCHASE_MORE_THAN_ONE_COPY_EXCEPTION,
        );
      }
    });

    it('should allow a user to buy more than one different books', async () => {
      const newBook = await service.createBook({
        ...createBookInput,
        author: author._id,
        isbn: '234ESJJ', // To avoid having the same isbn, violating a unique constraint we put in the schema
      });

      const updatedBook: Book = await service.buyBook({
        bookId: newBook._id,
        userId: user._id,
      });

      expect(updatedBook.readers.length).toBe(1);
      expect(updatedBook.readers[0].name).toBe(user.name);
    });
  });
...
As you can see here, we are trying to get access to the buyBook method inside our service that we haven’t implemented, also, on top of the new scope, I have created a new beforeAll hook, so that I can create a user before testing an purchase case.
Also notice that I have created a global author variable, instead of the one we had, and updated a little bit the main beforeAll hook like following:
  beforeAll(async () => {
    module = await Test.createTestingModule({
      providers: [BookService, AuthorService, AuthorModule],
      imports: [
        rootMongooseTestModule(),
        ConfigModule.forRoot(),
        AuthorModule,
        UserModule,
        MongooseModule.forFeature([
          {
            name: Book.name,
            schema: BookSchema,
          },
          {
            name: Author.name,
            schema: AuthorSchema,
          },
          {
            name: User.name,
            schema: UserSchema,
          },
        ]),
      ],
    }).compile();

    service = module.get<BookService>(BookService);
    authorService = module.get<AuthorService>(AuthorService);
    userService = module.get<UserService>(UserService);
    // We first create a new author, otherwise it will throw an error by using the generated one
    author = await authorService.create(createAuthorInput);
  });
Let’s run again the $ yarn test:watch command and as we could expect, we are receiving error saying that we don’t have the buyBook method in the bookService
FAIL  src/app/book/book.service.spec.ts
  ● Test suite failed to run

    src/app/book/book.service.spec.ts:169:47 - error TS2339: Property 'buyBook' does not exist on type 'BookService'.

    169       const updatedBook: Book = await service.buyBook({
                                                      ~~~~~~~
    src/app/book/book.service.spec.ts:180:29 - error TS2339: Property 'buyBook' does not exist on type 'BookService'.

    180         await await service.buyBook({
                                    ~~~~~~~
    src/app/book/book.service.spec.ts:200:47 - error TS2339: Property 'buyBook' does not exist on type 'BookService'.

    200       const updatedBook: Book = await service.buyBook({
Well, we need to refactor our book.service.ts file so that we pass these test cases:
In the book.service.ts file, let’s implement the buyBook method, having the requirement we have set in our test file:
// book.service.ts

...
    // BUY BOOK FEATURE
  async isPurchased(buyBookInput: BuyBookInput) {
    const books = await this.bookModel.find({
      'readers._id': buyBookInput.userId,
    });

    // console.log('BOOKS', books);
    return books.length >= 1;
  }

  async buyBook(buyBookInput: BuyBookInput) {
    if (await this.isPurchased(buyBookInput)) {
      throw new Error(CANNOT_PURCHASE_MORE_THAN_ONE_COPY_EXCEPTION);
    }

    return this.bookModel
      .findByIdAndUpdate(
        buyBookInput.bookId,
        {
          $push: {
            readers: buyBookInput.userId,
          },
        },
        { new: true },
      )
      .populate('readers');
  }
...
Using this code above, we can see now our tests pass, bingo we have added a new feature a tdd way.
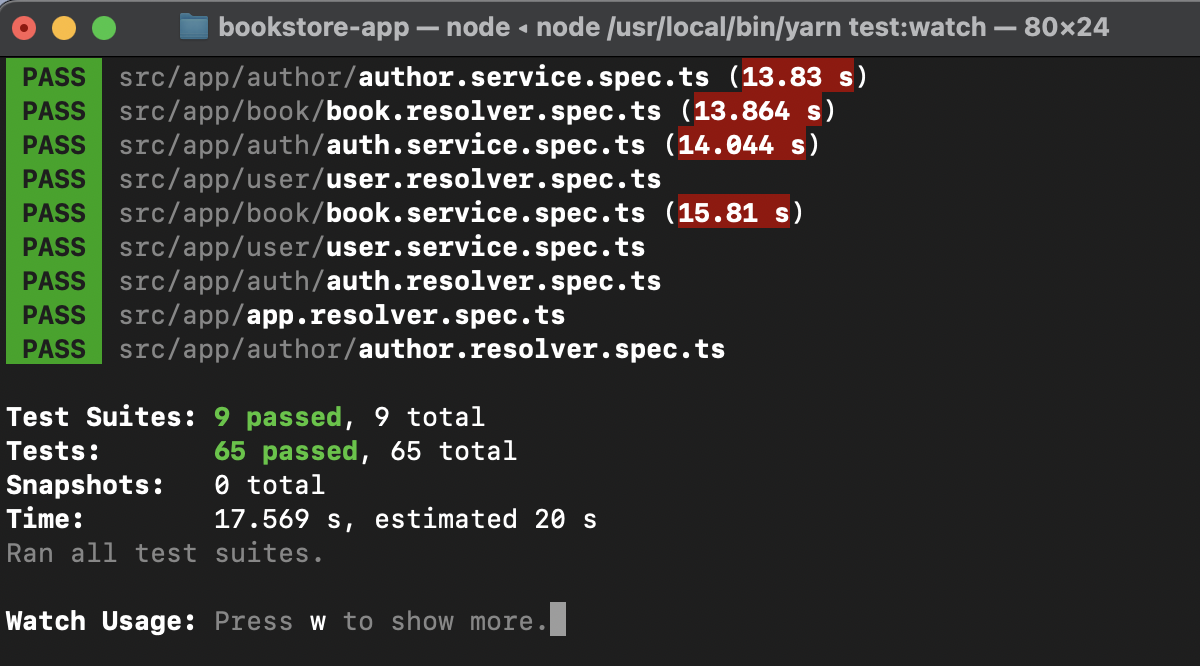
image8 - Added buyBook using a TDD approach
🛠️ Now, let’s do the same for the resolvers, starting with the book.spec.ts file
Conclusion
In conclusion, this reading delves into the subject of Test Driven Development (TDD) for GraphQL, showing the advantages it offers to the development process. By the end, readers will have a clear understanding of how to test existing resolvers and implement new ones using TDD for GraphQL. This knowledge is invaluable in ensuring the quality and reliability of GraphQL applications.
Have you enjoyed this reading? Let’s connect on Twitter, LinkedIn, and GitHub for more content like this.
Thank you for reading, and sharing with your network, let’s meet in the CI/CD part.

